1. Access Your Instance
The first step of the Quickstart: sign in to your portal and spend five minutes learning where things are, so that the rest of the path is a matter of following directions rather than hunting for menus. This page is for anyone on their first session, whether you will go on to administer the instance or only to work tickets in it.
Before You Begin
- Your portal URL — the address assigned to your organization's instance, in one of the formats in Step 1 below.
- Your credentials — either an account with a Microsoft or Google identity provider, or a username and password.
- Chrome or Firefox, current version. See Fluency Web Interface for the supported-browser list.
If you have not received access, raise a support ticket.
Step 1 — Open Your Portal URL
-
Find your instance URL. Standard deployments use:
https://<companyname>.app.ingext.ioOlder deployments use one of:
https://<companyname>.cloud.fluencysecurity.comhttps://<companyname>.app.fluencyplatform.comCustom deployments, self-hosted instances, and MSSP-managed portals use their own hostname, which may be one your organization chose.
-
Open it in Chrome or Firefox.
-
You land on the login page, which offers two OAuth options — Microsoft and Google — and an Alternative Login option for a username and password.
If you do not know your URL
Look in your onboarding email, ask whoever administers the instance, or — if you deployed it yourself — take it from the deployment output. Support can also confirm it: see Fluency Web Interface.
Step 2 — Sign In
- Choose your authentication method. OAuth with Microsoft or Google is the preferred route; use Alternative Login for a username and password. Which one applies to you was decided when your account was created — by the initial setup if you are the first user, or by the administrator who added you.
- Complete the provider prompt. If this is the first time your organization has signed in to Fluency through Microsoft, you are asked to accept two application permissions — Sign you in and read your profile and Maintain access to data you have given it access to. Granting them redirects you back to the portal.
- You land on the Home dashboard.
Login covers each method in full, including the permission prompts and changing a password.
First-user setup
If you are the very first user in a brand-new instance, the OAuth provider is chosen during initial setup, and every account after yours is created by an existing administrator from Settings → Users. See Managing Users.
Step 3 — Get Your Bearings on the Home Dashboard
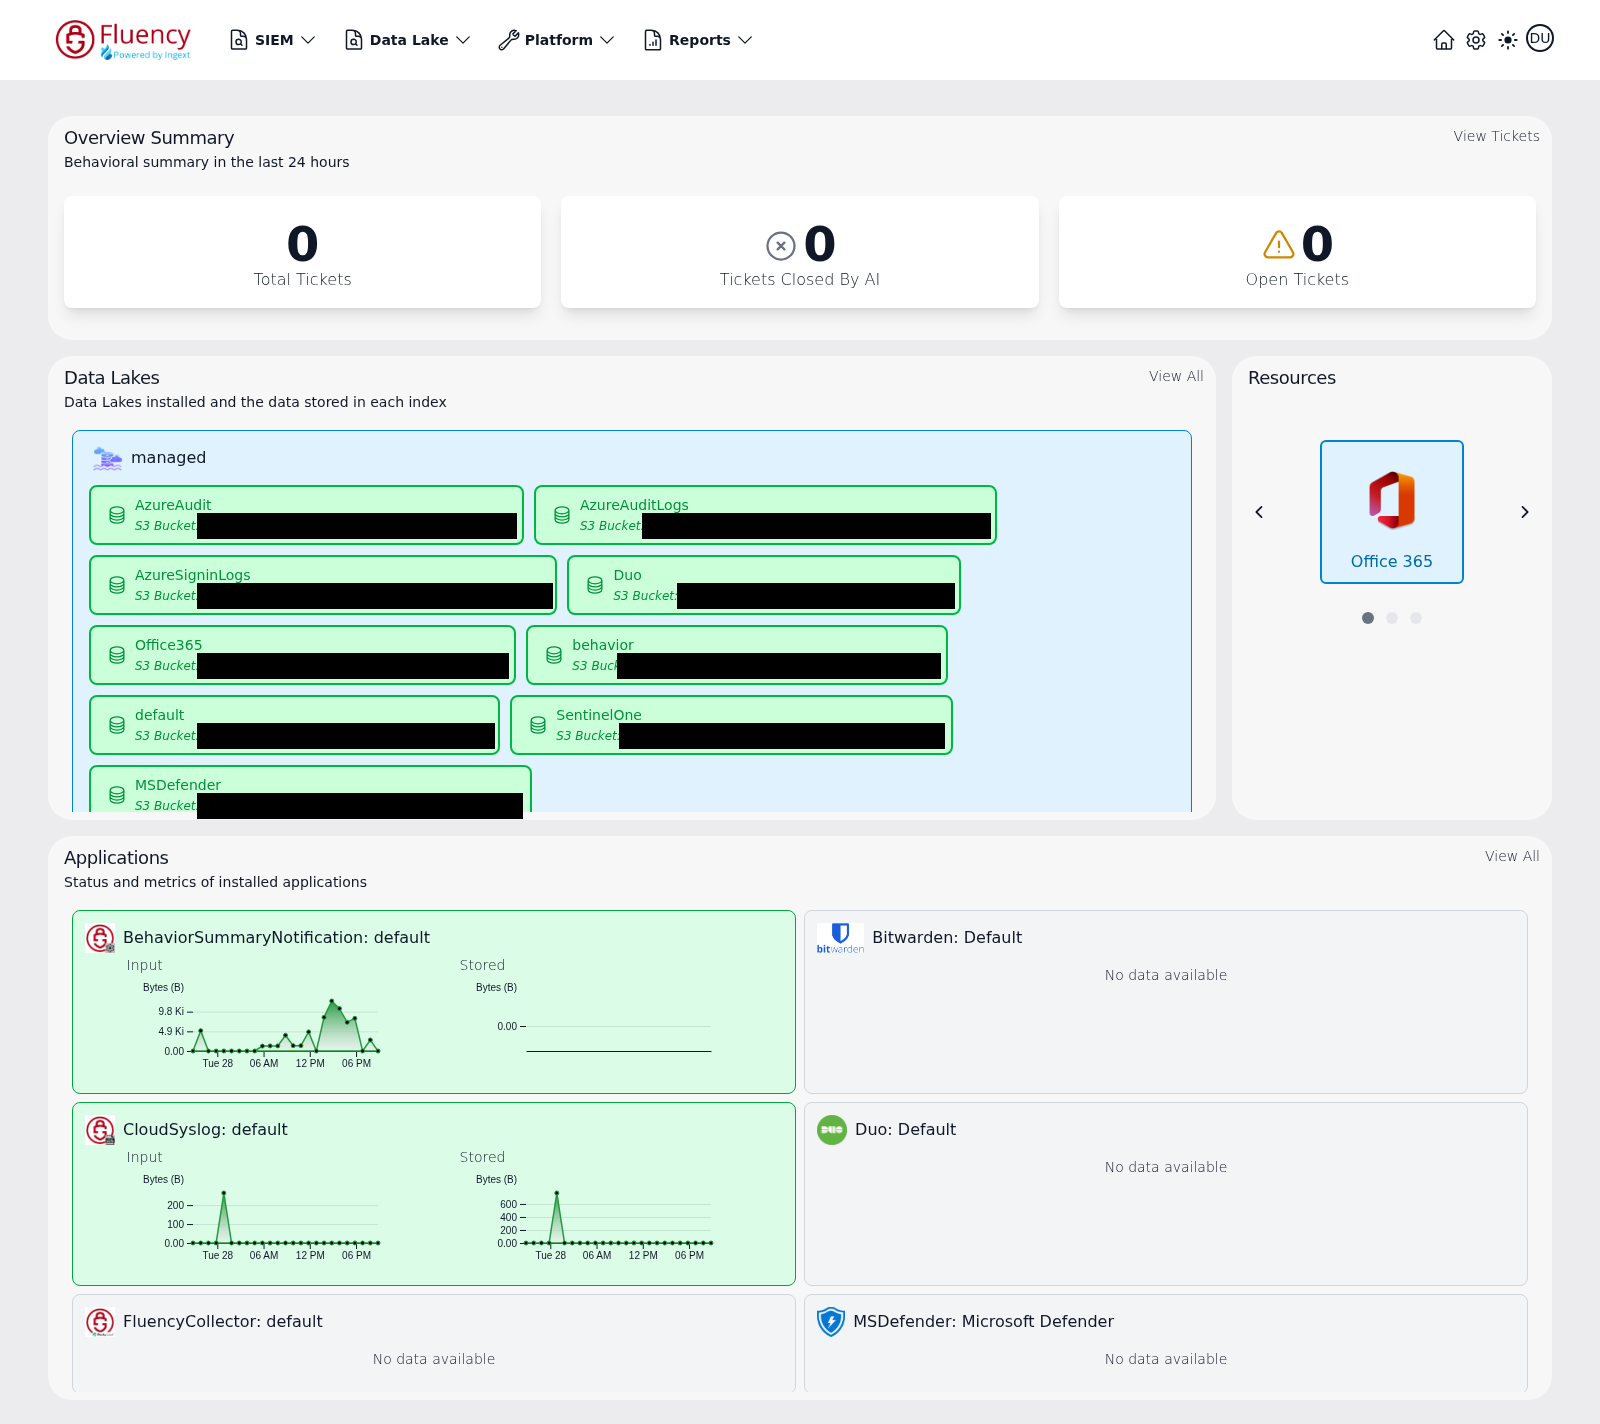
The dashboard is three stacked panel rows:
- Overview Summary — a full-width panel at the top with three counter tiles for the last 24 hours: Total Tickets, Tickets Closed By AI, and Open Tickets.
- Data Lakes (left) and Resources (right) — a two-panel row in the middle. Data Lakes lists each lake as a named group, with a chip per index showing the index name and the S3 bucket and object prefix backing it. Resources is a carousel of the integrations that have contributed resource records, stepped with the ‹ and › arrows; it reads No resources installed when there are none, and has no controls in that state.
- Applications — a full-width panel of status cards at the bottom, one per installed application, titled with the application type and the instance it is configured for. A card that is receiving data is tinted green and carries two small time-series charts, Input and Stored, plotting bytes over the recent 24 hours; a card with nothing recent reads No data available instead.
Every panel except Resources has a link in its upper-right corner that opens the corresponding full page — View Tickets on Overview Summary, View All on Data Lakes and Applications.
On a fresh instance most of this is empty: all three counters read zero, the Resources panel says No resources installed, and there may be no application cards at all. That is the expected starting state, and step 2 of this quickstart is what fills it in.
Step 4 — Tour the Four Top-Level Menus
The navigation bar is the same on every page. Walking it once now means you will recognize each destination when a later step names it.
SIEM
Detection and triage: Overview Summary, Behavior Summary, Behavior Timeline, Resources, Behavior Rules, and EntityInfo Tables. Step 5 lives entirely in this menu.
Data Lake
Storage and search: Search, Investigations, Management, Schemas, KQL Query Builder, and KQL Search History. Step 3 uses Management; step 4 uses Search and the KQL Query Builder.
Platform
The data pipeline: Applications, Configuration, Integrations, Processors, and Usage, plus two sub-menus — Assets (Assets Search, Metrics Alerts) and Administration (Resource Sync, Collectors, Syslog Ports, Notifications). Steps 2, 3, and 6 all work here.
Reports
Dashboard, Processors, and Scheduler. The quickstart does not use them, but they are named here so the menu is not a surprise later.
The right-hand side of the bar
The Home icon, the Settings (gear) icon, the light/dark theme toggle, and the account avatar. Two things are worth fixing in your memory now, because they are the most common source of hunting later:
- Account and organization administration lives behind the gear, not in the four menus. It opens on the Users area at
/settings/team, with Advanced (GitHub, AWS Roles, Permissions) and Management (Audit, Reports, Lake Tasks) as expandable groups in its sidebar. - Your own settings live behind the avatar, which is a separate menu from the gear.
Navigation is the menu-by-menu reference this tour summarizes.
Step 5 — Set Your Preferences
Open the account avatar at the far right of the navigation bar and choose your email address. The Profile page opens at /user/profile.
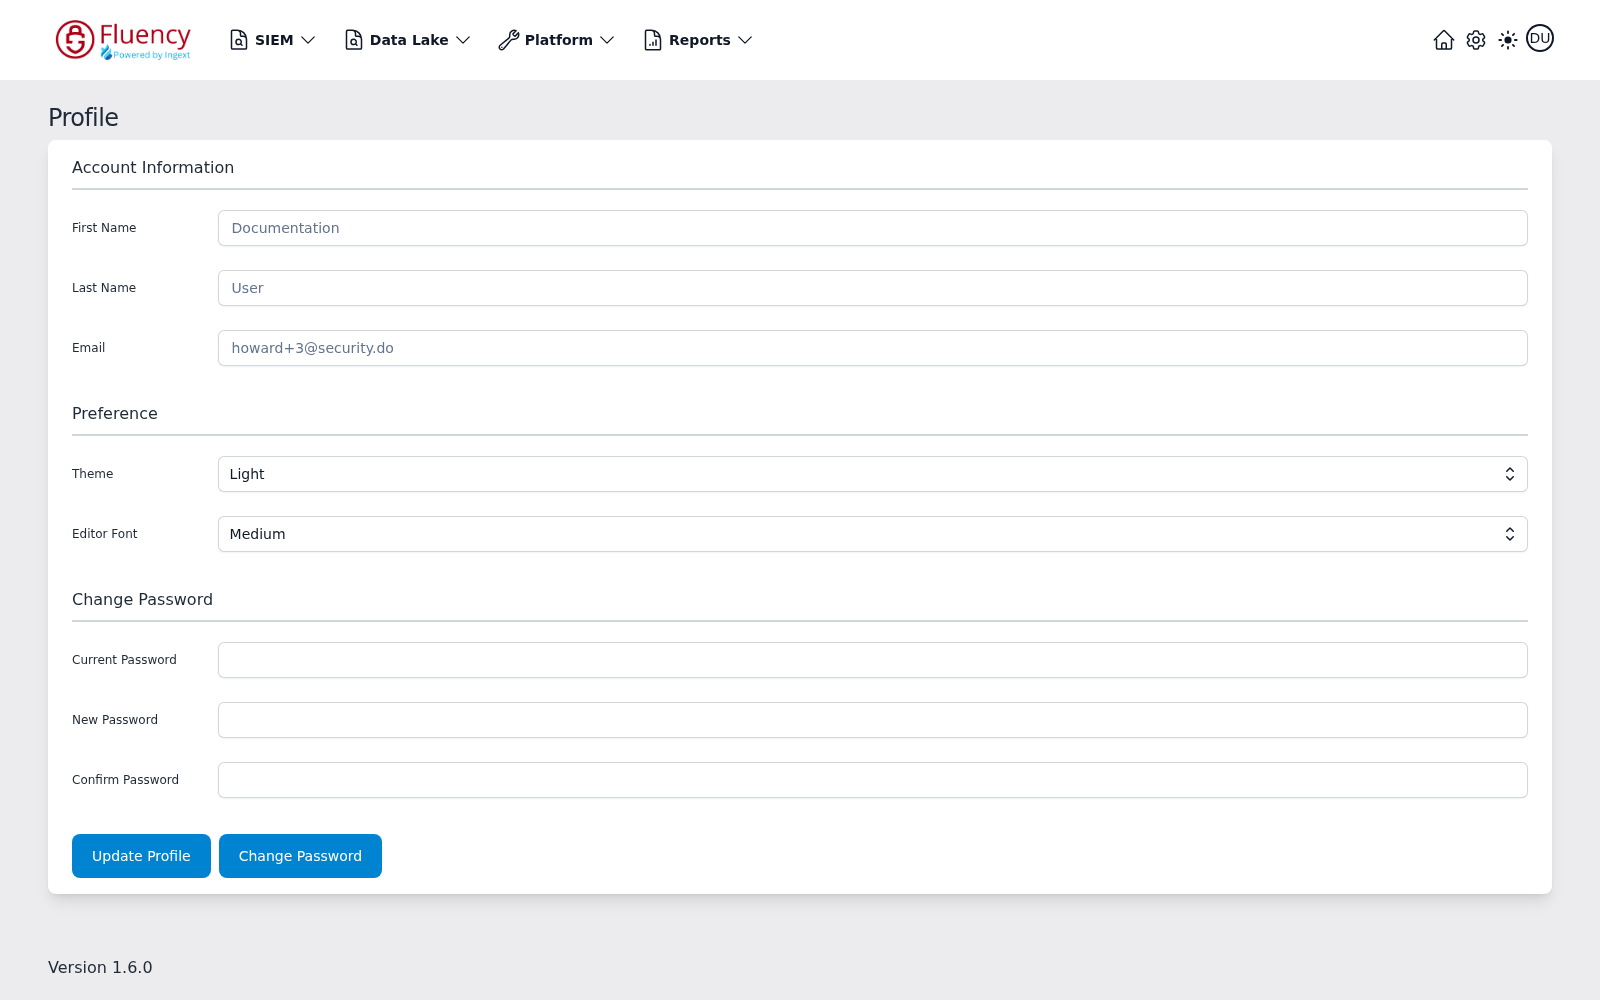
- Check Account Information — First Name, Last Name, and Email.
- Set Preference — Theme (Light or Dark) and Editor Font (Small, Medium, or Large, which sizes the text in the FPL and query editors you will use later). Click Update Profile; a green Profile updated successfully toast confirms the save.
- If you signed in with a username and password, set your own password in the Change Password section — Current Password, New Password, Confirm Password, then the Change Password button. Leaving Current Password empty produces a red Please enter your current password toast. If you signed in through Microsoft or Google, your password belongs to that provider and this section does not apply.
The theme can also be flipped at any time with the sun/moon toggle in the navigation bar. The application version is printed in the lower-left corner of the Profile page — worth noting before you open a support case.
Tokens for the REST API are account administration, not personal settings, and live under Settings → Advanced → Permissions. See API Tokens.
How to Tell It Worked
- You reach the Home dashboard without an error, and the navigation bar is visible across the top.
- All four menus open, and you can say in one sentence what each is for.
- The account avatar shows the expected user, and its menu opens your Profile.
- If you are an administrator, the Settings gear opens the Users area.
If It Did Not Work
| Symptom | Cause | What to do |
|---|---|---|
| The URL does not resolve, or shows an unrelated page | Wrong hostname — an older deployment format, or a custom hostname | Check the onboarding email against the formats in step 1, or ask your administrator. |
| The Microsoft or Google prompt refuses with a consent or admin-approval error | Your tenant restricts user consent to applications | An administrator has to approve the two sign-in permissions once for the organization. See Login → OAuth App permissions. |
| Sign-in succeeds but pages are empty or actions are refused | The account exists but has no role assigned | An administrator assigns roles from Settings → Users. See Managing Roles. |
| The login page loads but the OAuth buttons do nothing | A browser extension or network policy is blocking the redirect to the provider | Try a private window with extensions off, or a different network. |
| Nothing above matches | — | Create a support ticket with your instance URL and the exact error text. |
Next Step
2. Connect Your First Source — put real data into the instance.
Related
- Fluency Web Interface — portal access, login, and navigation in full
- Navigation — the menu-by-menu reference this tour summarizes
- Page Functionality → Home — the dashboard, panel by panel
- Page Functionality → Profile — the account page, field by field
- Managing Users — adding the rest of your team