2. Connect Your First Source
The second step of the Quickstart: choose one real data source, connect it, and leave the platform actively collecting from it. This page is for the administrator doing the initial setup.
It uses Microsoft 365 as its worked example, connected with the Office365-Audit application template. That template exercises every part of the process in one pass — a credential you create in an external service, an application installed from a template, three data lake indexes, and a pipeline that appears on the Configuration diagram — and it finishes in one sitting rather than waiting on someone else's approval.
The setup has two halves:
- In Microsoft Entra ID — register an application, add nine read-only permissions across two Microsoft APIs, grant admin consent, and create a client secret. This produces three values: a Tenant ID, a Client ID, and a Client Secret. About 15 minutes.
- In Fluency — install the Office365-Audit template and paste those three values into its form. About 5 minutes.
Before You Begin
- You can sign in to the portal (step 1) with an account that can install applications.
- You hold, or can borrow, an Entra identity that can both register an application and grant tenant-wide admin consent — Global Administrator, or Privileged Role Administrator combined with Application Administrator or Cloud Application Administrator.
- Unified audit logging is on in the Microsoft 365 tenant. Nothing reaches the Office 365 API until it is, and turning it on is not retroactive. Office 365 Audit → Before you begin has the PowerShell check.
The Entra directory audit works on every tier. The sign-in log is premium-only: without Microsoft Entra ID P1 or P2, the AzureSigninLogs index stays empty and the rest of the integration is unaffected. That is expected, not a fault.
If you are not using Microsoft 365
The shape of this page is the same for every source — prepare the source side, install a template, look at the pipeline it built. Only the vendor-side half changes. Find your source in the Integration Matrix, then follow its own guide for the first half and rejoin this page at Step 3. If your source is a firewall, a server, or anything else on your own network, start at How Data Gets In instead — those arrive by syslog, HEC, or a collector rather than by API.
Step 1 — Choose a Source
Criteria for a good first source
Prefer a source you fully control, that produces steady volume, and whose data you can recognize when you see it. Resist starting with your highest-volume production firewall: a first connection is for learning the mechanics, and a noisy source makes every subsequent step harder to read.
Why this page uses Microsoft 365
- It is entirely cloud-side. Nothing is installed on any machine you own.
- The credential is one you create yourself and can rotate on your own schedule, so the setup finishes in one sitting. The alternative Microsoft templates use administrator consent, which puts a decision in someone else's inbox and leaves the application reporting healthy and collecting nothing until they act on it.
- One application covers three feeds — the unified audit log, the Entra directory audit, and Entra sign-ins — instead of three applications with three separate consent grants.
- The data is well understood by the rest of the platform: the search page already ships facet configurations for it, and sign-in activity is exactly the kind of thing behavior rules score, so step 5 has something to show.
What arrives
| Index | Source | Contents |
|---|---|---|
Office365 | Office 365 Management Activity API | The unified audit log — mail, file, site, Teams, admin, and DLP activity across every Microsoft 365 workload, plus service-health messages. |
AzureAudit | Microsoft Graph | Directory changes: users and groups created or modified, role assignments, application and consent grants, password resets. |
AzureSigninLogs | Microsoft Graph | Interactive sign-ins with the client IP, device, application, conditional-access result, and risk state. |
Alongside those, the application reads the directory itself — users, groups, devices, applications, policies — which is what lets Fluency resolve an object GUID in an audit record to a name.
Step 2 — Prepare the Source Side
Everything in this step happens in the Microsoft Entra admin center, or in the Azure portal under Microsoft Entra ID. Office 365 Audit is the full version of this half, including an Azure CLI and PowerShell script that does the same thing unattended; what follows is the shortest path through the portal.
2.1 Register the application
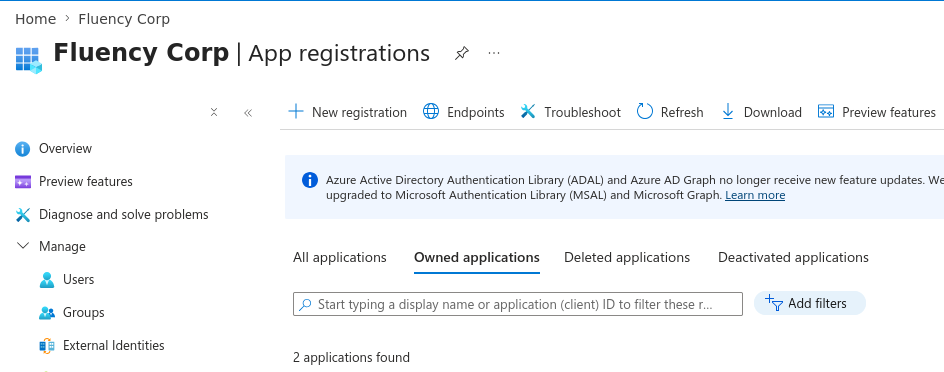
Go to App registrations → New registration.
- Name — anything recognisable.
ingext-azureauditis a good default. - Supported account types — Accounts in this organizational directory only (single tenant).
- Redirect URI — leave blank. This application never signs a user in.
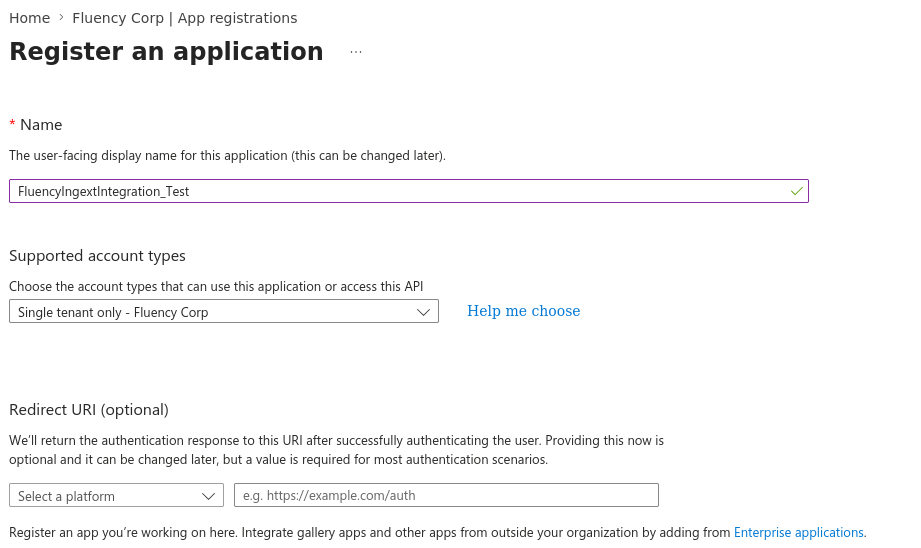
Click Register.
App registrations → New registration is the right path. Enterprise applications → New application looks similar and produces a service principal, but gives you nowhere to add API permissions or a client secret. If you find yourself on a page headed Browse Microsoft Entra App Gallery, you are in the wrong place.
2.2 Add the Microsoft Graph permissions
On the new application, go to API permissions → Add a permission. On the Microsoft APIs tab choose Microsoft Graph, then Application permissions — the app-only path, for an application that runs without a signed-in user.
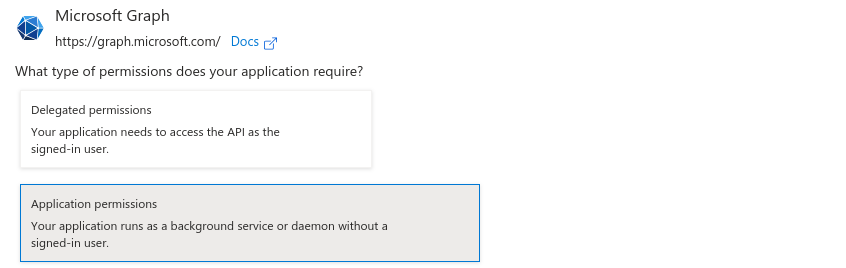
Search for and tick these six:
AuditLog.Read.AllDirectory.Read.AllPolicy.Read.AllReports.Read.AllUserAuthenticationMethod.Read.AllMailboxSettings.Read
Take the .Read variant in each case, never .ReadWrite — the picker lists both next to each other, and the read-write permission is a strictly wider grant this integration has no use for. Click Add permissions.
2.3 Add the Office 365 Management API permissions
The unified audit log does not come from Graph. It comes from a separate API with its own service principal, so this is a second trip through Add a permission: Microsoft APIs → Office 365 Management APIs → Application permissions, then tick all three:
ActivityFeed.ReadActivityFeed.ReadDlpServiceHealth.Read
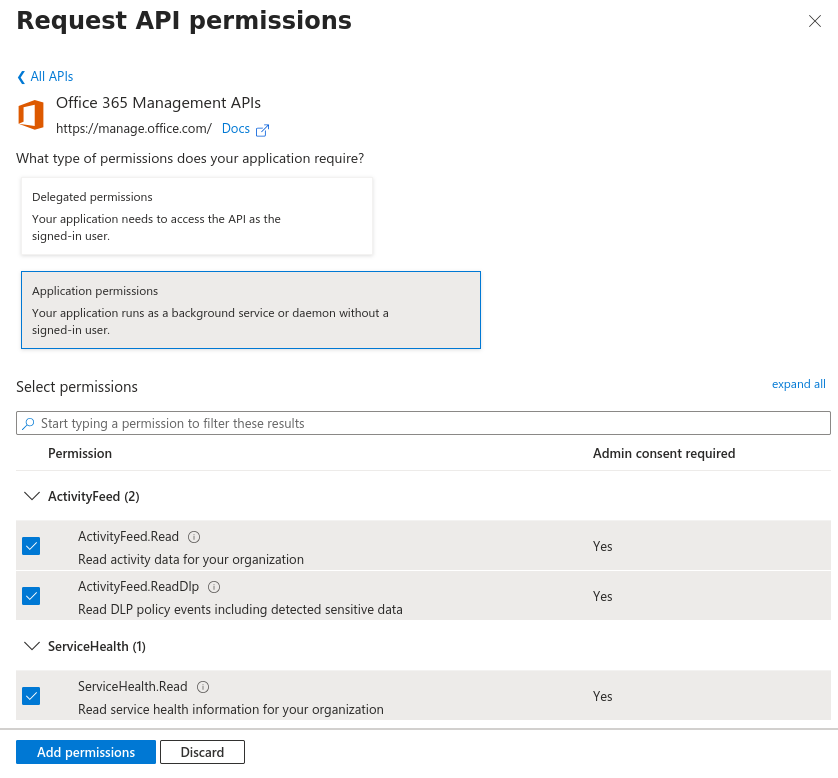
Click Add permissions. All nine should now be listed under Configured permissions as Microsoft Graph (6) and Office 365 Management APIs (3), every row with Type Application and Status Not granted.
If Office 365 Management APIs is not offered, the tenant has never had its service principal provisioned — Office 365 Audit has the one-line fix.
2.4 Grant admin consent
Application permissions do nothing until an administrator consents on the tenant's behalf. On the same API permissions page, click Grant admin consent for <tenant> and confirm.
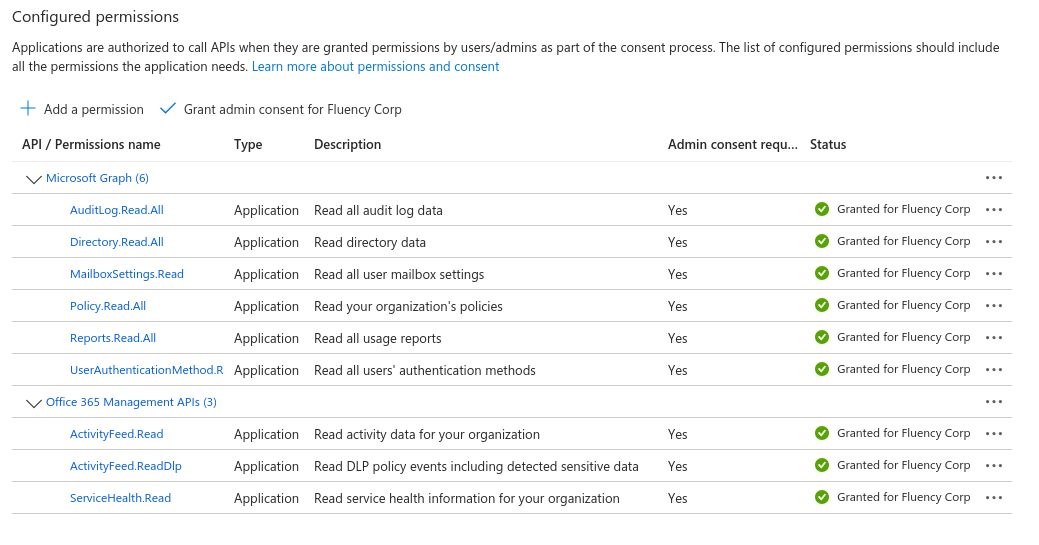
All nine rows must then read a green Granted for <tenant>. If the button is greyed out, the account you are signed in as does not hold consent rights — the application and its permissions are already saved, so ask an administrator who does to open the same page and click it.
Consent applies to whatever is listed at the time you click. A permission added later but never consented to returns 403 while the others keep working, which reads as "the integration works, but SharePoint events are missing" rather than as an error.
2.5 Create a client secret
Go to Certificates & secrets → Client secrets → New client secret. Give it a description you will recognise in two years, choose an expiry, and click Add.
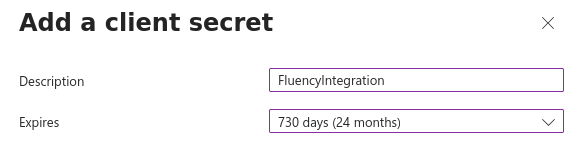
The drop-down opens on Recommended: 180 days (6 months) and the portal caps it at 24 months. Pick whatever your rotation policy allows, and write the expiry date down — when the secret expires, collection stops with no warning on the Fluency side.
The new secret appears with its Value shown in full, exactly once. Navigate away and it is masked forever; the secret cannot be recovered, only replaced.
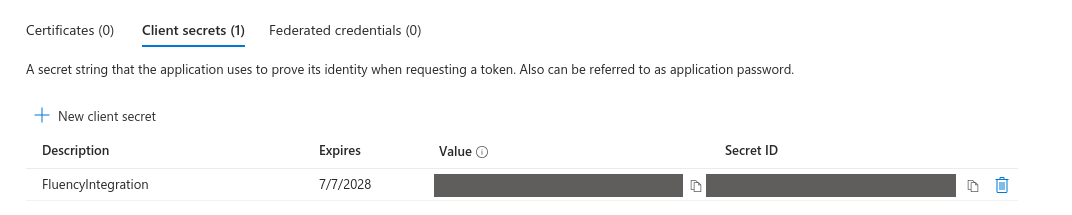
The Secret ID in the next column is not the secret. It stays fully readable, which is exactly why it gets copied by mistake — and pasting it into Fluency is the single most common cause of an application that installs and then immediately aborts.
2.6 Record the Tenant ID and Client ID
Go to the application's Overview page and copy two values from Essentials.
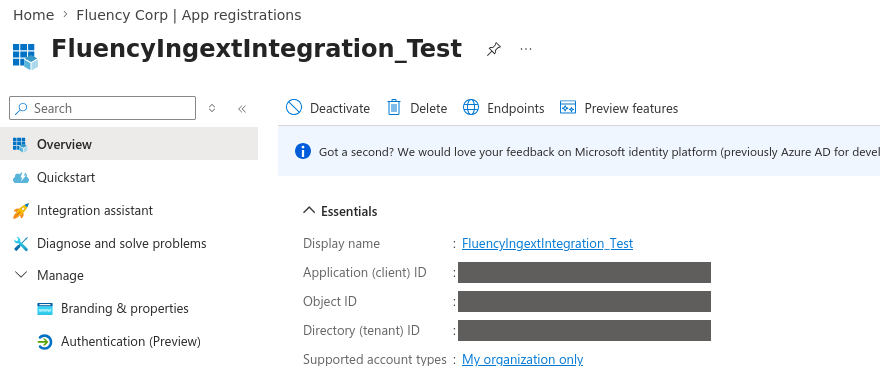
What to have in hand before leaving Microsoft
Three values, and only three. All of them go into the same form in step 3; nothing here is entered anywhere else.
| Fluency field | Where it comes from | Sensitive? |
|---|---|---|
| Azure Tenant ID | Overview → Directory (tenant) ID | No — readable from the portal at any time |
| Azure ClientID | Overview → Application (client) ID | No — readable from the portal at any time |
| Azure ClientSecret | Certificates & secrets → the secret's Value | Yes — shown once, unrecoverable |
Ignore Object ID. It identifies the application object in the directory and is not used here.
Step 3 — Install the Application
-
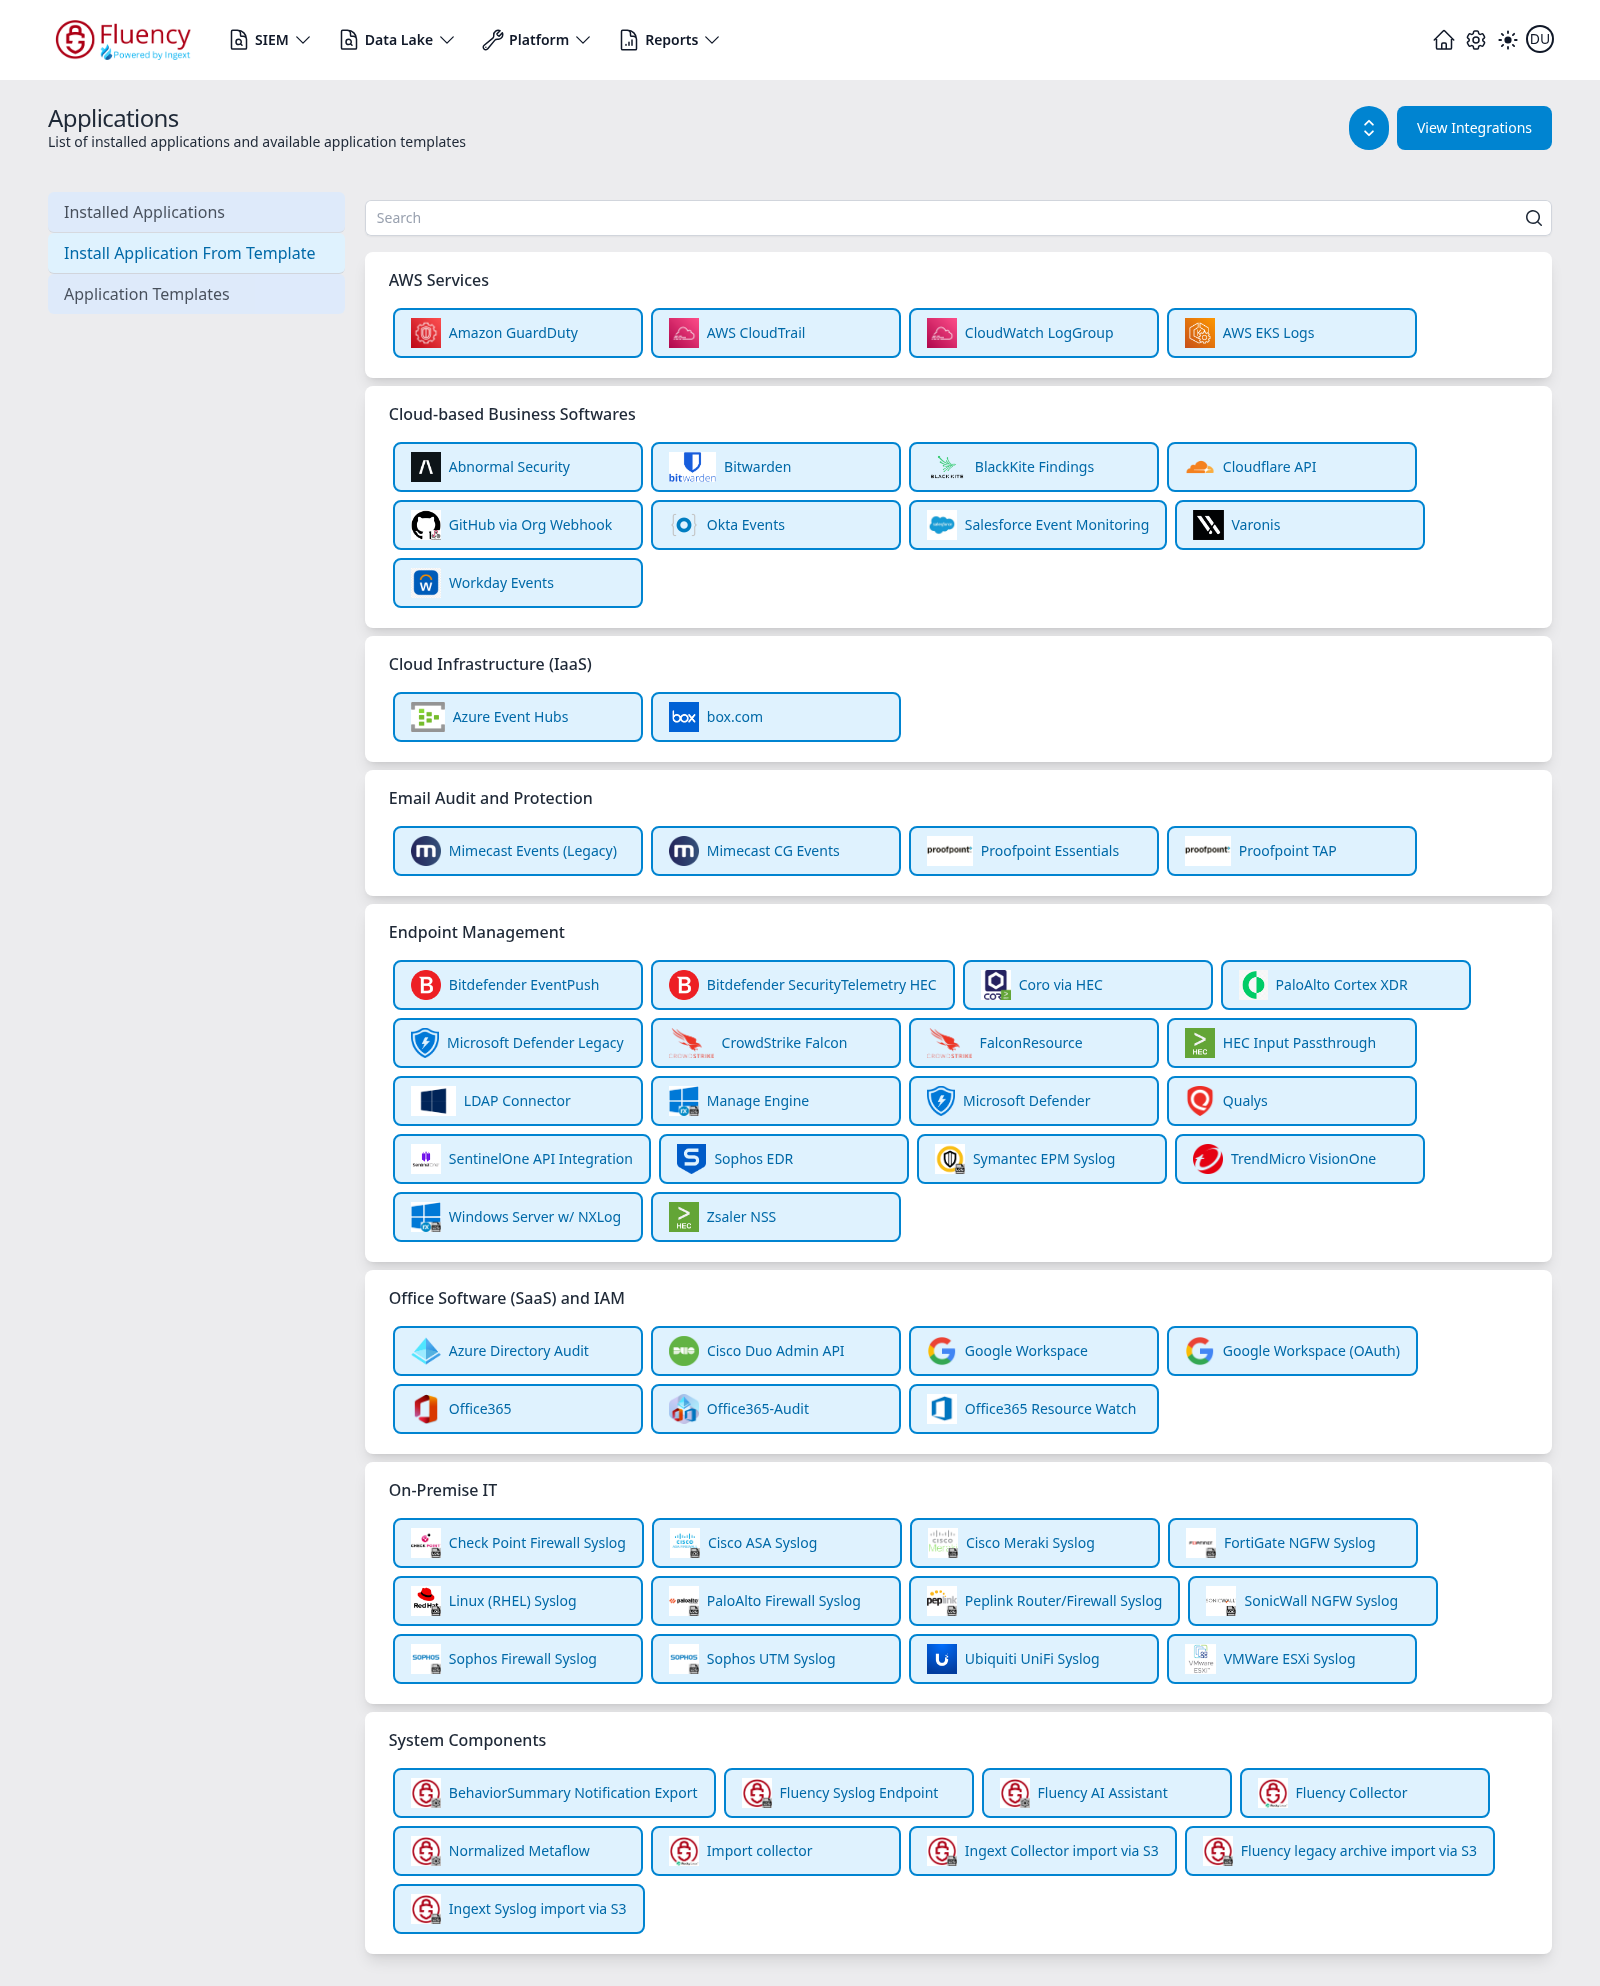
Open Platform → Applications and select Install Application From Template.
-
Find the Office365-Audit tile under the Office Software (SaaS) and IAM category. The catalog is a stack of category cards with a Search box spanning the top; every tile shows the template's icon and display name, four to a row. The eight categories — AWS Services, Cloud-based Business Softwares, Cloud Infrastructure (IaaS), Email Audit and Protection, Endpoint Management, Office Software (SaaS) and IAM, On-Premise IT, and System Components — hold 65 templates between them.
-
Click the tile. A Setup New Office365-Audit Application panel opens on the right.
-
Leave Name and Display Name at
default/Defaultfor a first install. Change both when you add a second instance of the same template — collecting from two Microsoft 365 tenants, for example — so you can tell them apart on the applications list. -
Fill in the Parameters. Every one of them is required:
Parameter What to enter Azure Tenant ID The Directory (tenant) ID from step 2.6. Azure ClientID The Application (client) ID from step 2.6. Azure ClientSecret The secret Value from step 2.5 — not the Secret ID. Masked once the application is installed. datalake index name for AzureAudit Pre-filled AzureAudit. Receives the directory audit. -
Leave Advanced Configurations collapsed. The collapsed row below Parameters holds two more fields — datalake, pre-filled
managedfor the platform-managed lake, and datalake index name, pre-filledOffice365for the unified audit log. Both defaults are right for a first install, which is why they are tucked away; expand the row only to send this application somewhere other than the managed lake, or to dodge the index-name collision described below. -
Press Install. There is no separate save-then-start step.
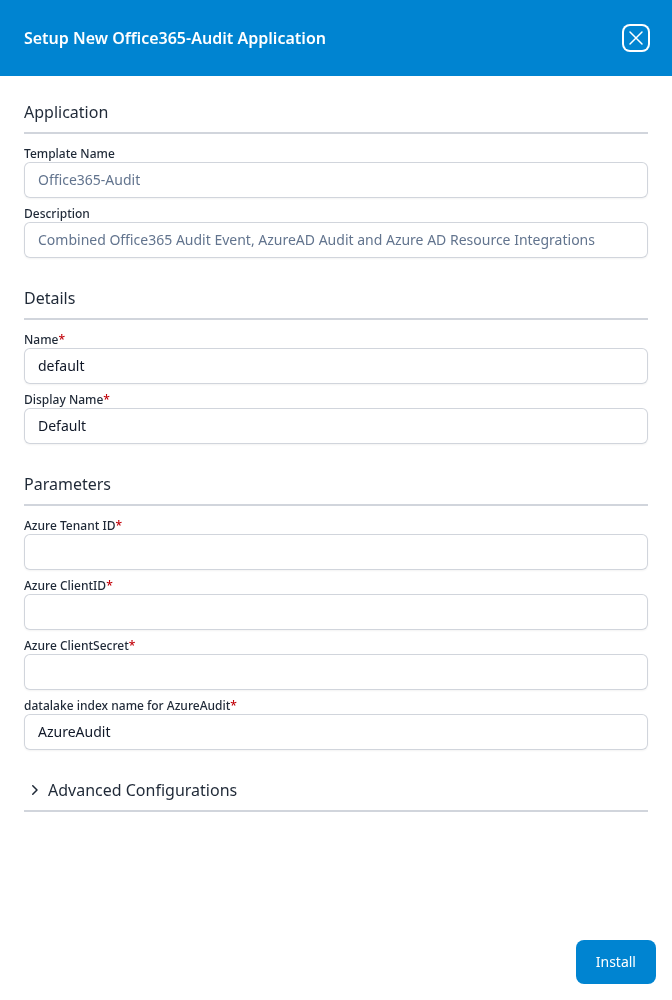
Every template's panel has the same sections; only the Parameters list changes, and it is absent entirely on templates that take none.
- Application — Template Name and Description, both read-only. They identify the template you clicked.
- Details — Name and Display Name, both required, pre-filled with
defaultandDefault. - Parameters — the template's own fields.
- Advanced Configurations — a collapsed row holding datalake and datalake index name, on the templates that let you choose where the events land.
Required fields carry a red asterisk after the label. Install sits in the lower-right corner; the X in the title bar closes the panel without installing. The panel is a fixed height and its body scrolls, so on longer forms the last parameters sit below the fold when it first opens. Every other template's form, field by field, is in Install Application From Template.
Two applications writing to the same index name in the same lake collide, and the second one aborts. Office365 is also the default for the separate Office365 template, and AzureAudit is also the default for Azure Directory Audit — so this template cannot run alongside either of those at their defaults. Either change the names here, or uninstall the separate application first. Note that the two names live in different places on the form: datalake index name for AzureAudit is in Parameters, while the Office365 one is the datalake index name inside Advanced Configurations.
The sign-in stream lands in a third index, AzureSigninLogs, which the install creates and which is not exposed as a parameter, so it cannot be renamed to dodge a collision.
About Platform → Integrations
Some templates take their credentials from a stored integration rather than from the install form. On the AWS templates, for example, a role registered on Platform → Integrations appears in the Pre-defined AWs Role drop-down, which is worth doing when several applications share one AWS account so the credential lives in one place.
The Microsoft templates are not one of those. Office365-Audit takes its tenant ID, client ID, and secret directly on the form, and you do not need to visit the Integrations page at all for this quickstart.
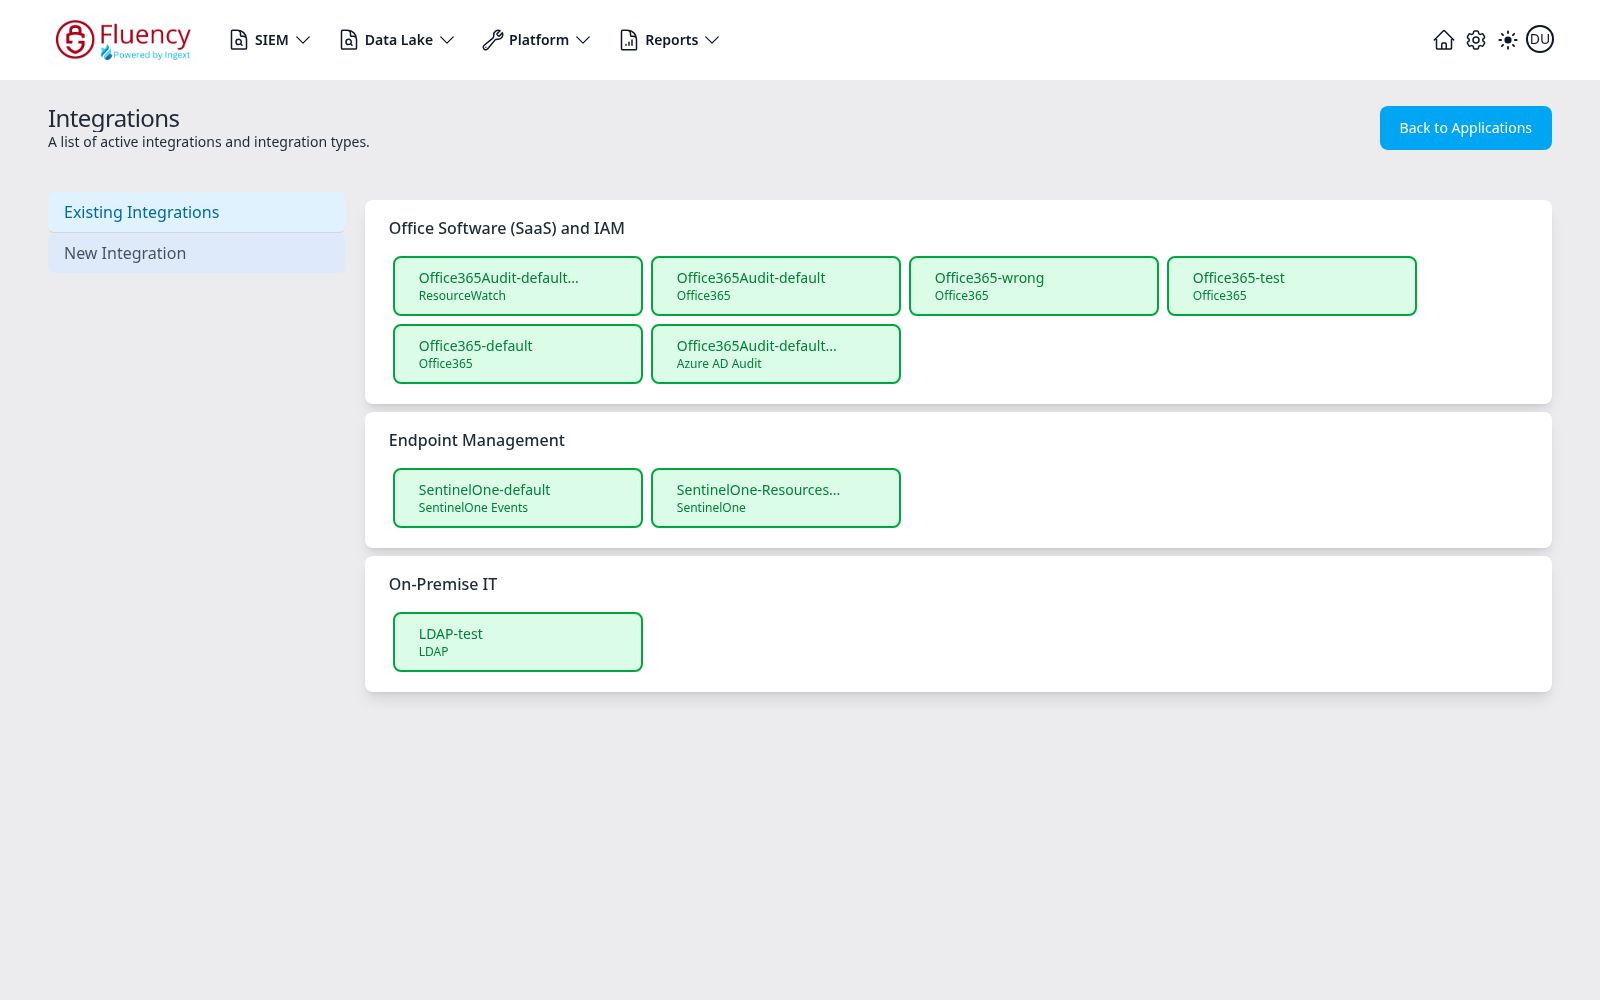
You will still see your new connection listed there once it is running. Platform → Integrations is subtitled A list of active integrations and integration types. and has two regions: a view selector on the left with Existing Integrations and New Integration, and the integration list on the right, grouped into category panels. Each tile shows the service icon, the integration's instance name, and its type — Office365 under Office Software (SaaS) and IAM — outlined in green while it is active.
What the application creates for you
Installing an application stands up the source, the processors, and the sinks as a unit. That is why the next step's Configuration diagram suddenly has more in it than it did five minutes ago: an Office365-Audit install produces three plugin data sources — one per collection path — feeding two routers, which fan out to the data lake sinks and to two management queues, and it creates the three indexes in the managed lake as a side effect. That last detail is why a name that is already taken aborts the whole application rather than just one stream.
Step 4 — Look at the Pipeline It Built
- Open Platform → Configuration.
- Find the new sources, routers, and sinks.
- Trace the path a record will take, left to right.
The purpose of this step is comprehension, not configuration — do not change anything yet.
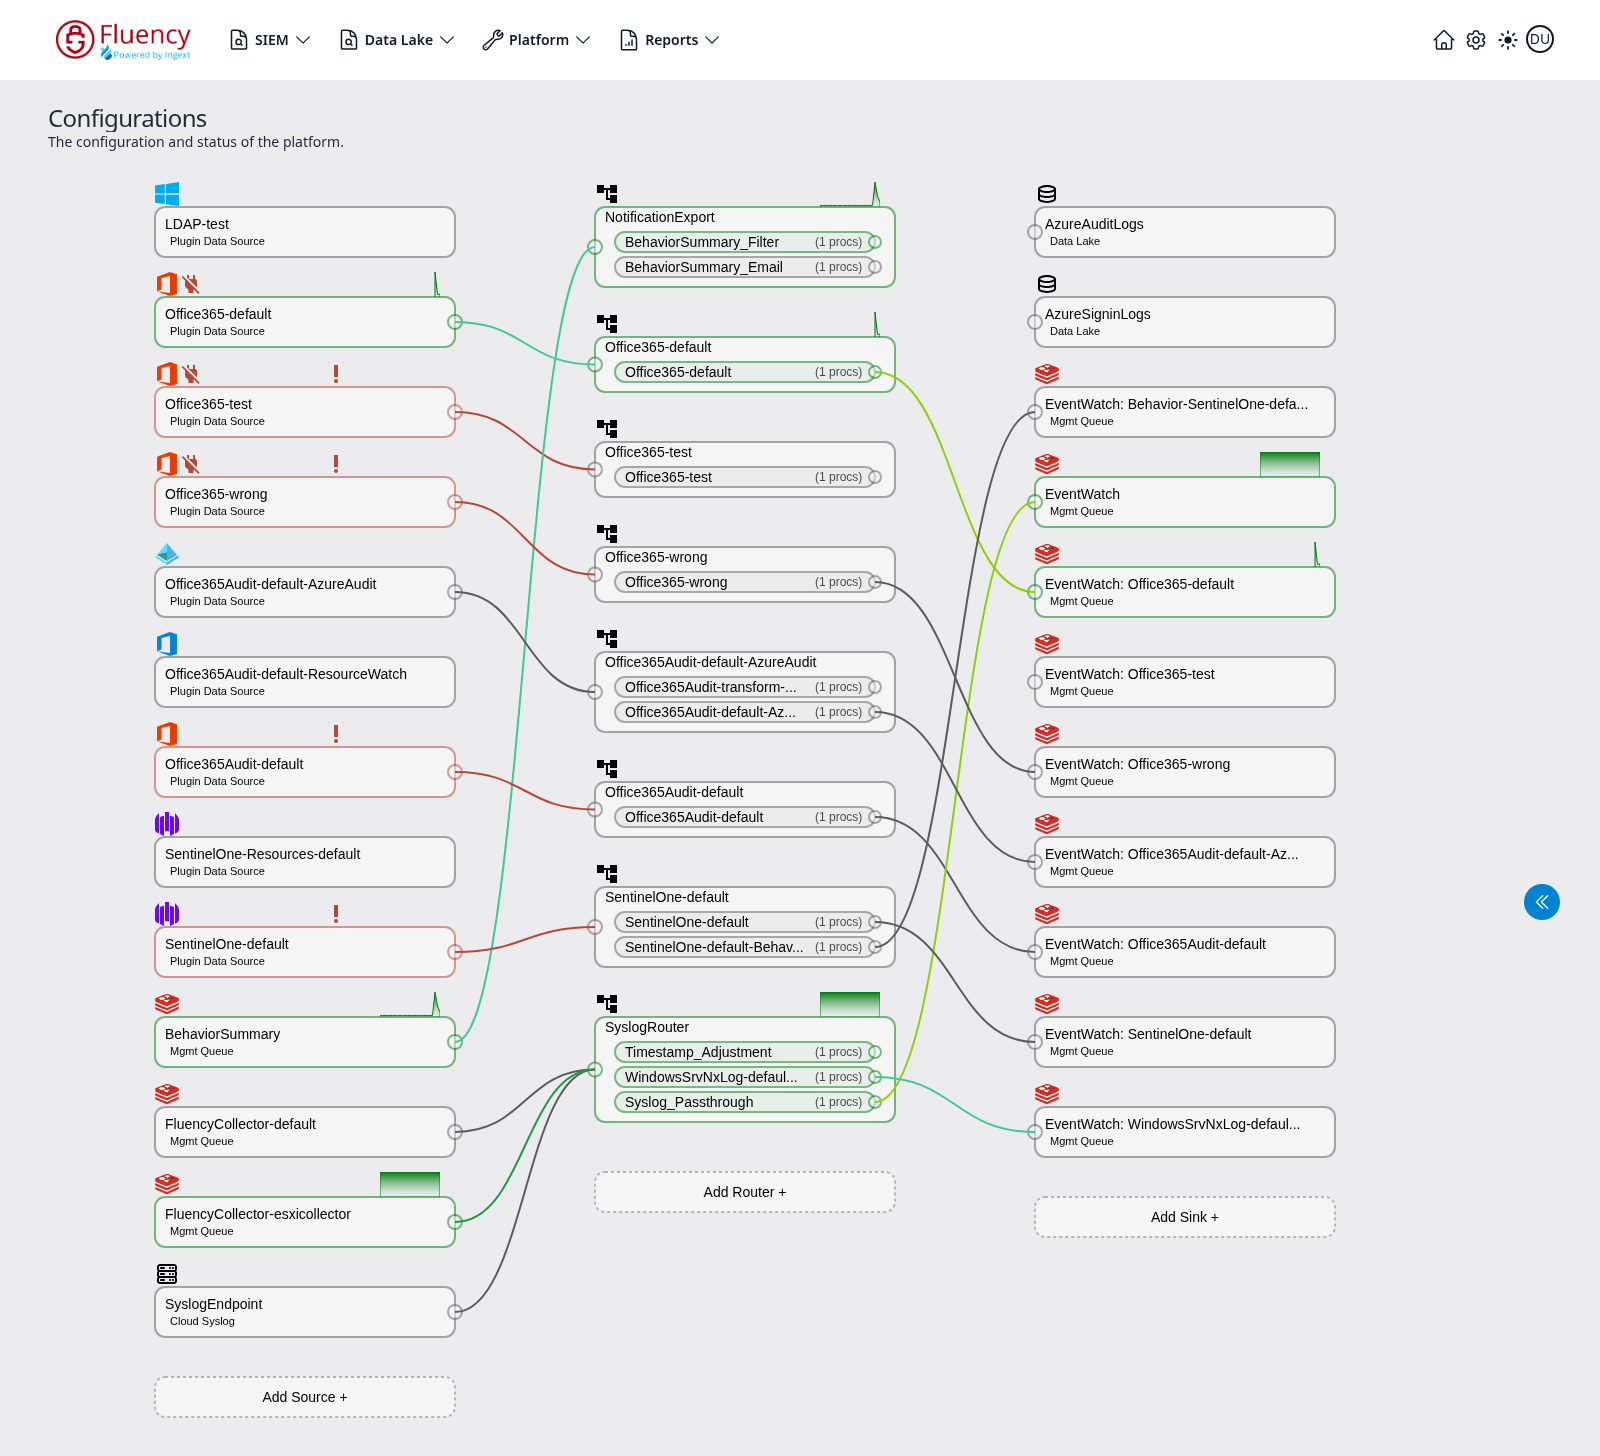
The page is titled Configurations, subtitled The configuration and status of the platform., and draws the pipeline as three columns read in the direction data flows: Sources, Routers, and Sinks. Each column ends with a dashed button — Add Source +, Add Router +, Add Sink + — for creating a new node of that type.
- A source card shows a type icon, the source name, and a label for the transport feeding it. An API-polled feed like this one appears as Plugin Data Source; other transports appear as Cloud Syslog, AWS S3 w/ SQS, or Mgmt Queue.
- A router card lists the pipes it runs, each row showing the pipe name and its processor count, for example (1 procs).
- A sink card shows the sink name and its type label.
Nodes that are actively moving data are outlined in green and display a small green throughput graph above the card's upper-right corner; idle nodes have a gray outline and no graph. Small circular ports sit on the edges of each card, and the coloured lines between them trace the exact path an event takes — line colours distinguish the individual flows where several cross.
Immediately after an install the new nodes will be grey. Green means data has moved, and that is step 3.
How to Tell It Worked
- The application appears in Installed Applications as
Office365-Audit: Office365-Audit, with a green Running badge. - Its details panel, behind the blue eye button, shows the parameters you entered with the secret masked, and an Actions list of the pipeline objects the install created.
- New sources, routers, and sinks are visible on the Configuration diagram.
- In Entra, all nine permissions read Granted for <tenant> and the client secret has not expired.
That is step 3, and it can lag by hours — up to 12 for the Office 365 unified audit log on a brand-new subscription. An application that reports Running with an empty index on the afternoon of the install has not failed.
If It Did Not Work
| Symptom | Likely cause | What to do |
|---|---|---|
| Aborted immediately after install, with an index name in the red error message | That index name is already taken in the lake | Uninstall the conflicting application, or reinstall this one with different index names. |
| Aborted, and no index is named in the error | The Secret ID was pasted instead of the secret Value, or the secret has expired | Uninstall, then reinstall with the secret's Value. If it was never captured, create a new secret — the old value is unrecoverable. |
Running, but the Office365 index stays empty | Unified audit logging is off in the tenant, or the subscription is still inside its first-content window | Check UnifiedAuditLogIngestionEnabled. If it is True, wait out the 12 hours before investigating further. |
AzureAudit fills but AzureSigninLogs stays empty | The tenant has no Entra ID P1 or P2 licence | Expected. The sign-in API is premium-only; the rest of the integration is unaffected. |
Some calls return 403 Forbidden while others work | Admin consent was granted before all nine permissions were added | Return to API permissions and Grant admin consent again. Every row must read Granted. |
| Collection worked, then stopped months later | The client secret expired — 180 days is the portal's default | Rotate the secret. |
The full symptom table, including the AF10001 and AF20022 API error codes, is on Office 365 Audit → Troubleshooting.
Next Step
3. Confirm Data Is Arriving — verify ingress in three independent places.
Related
- Office 365 Audit — the full worked integration, including the scripted alternative and how to rotate the secret
- Microsoft integrations — the other Microsoft 365 templates, and which one to choose
- Integration Matrix — which sources are supported, and by which method
- How Data Gets In — syslog, HEC, API polling, agents, and collectors
- Fluency Platform — the pipeline model the application builds for you
- Install Application From Template and Platform → Configuration — the two pages this step visits, control by control