Cloudflare
Cloudflare sits in front of an organisation's public web estate as DNS, CDN, WAF and reverse proxy, and it is one of the few places where an attack on a public service is visible before it reaches the service. Its API exposes two things worth collecting: the audit log, which records what administrators changed in the Cloudflare dashboard — DNS records edited, WAF rules disabled, API tokens minted, members added — and the GraphQL Analytics API, which serves the traffic, firewall and security analytics behind the dashboard's own graphs.
The audit log is the half most organisations underestimate. Cloudflare is a control plane for name resolution and traffic routing: an attacker who reaches it can repoint a hostname or switch off a firewall rule without touching a single server, and nothing on those servers records it happening.
The setup has two halves:
- In Cloudflare — create an API token scoped to the account, and read the Account ID.
- In Fluency — install the Cloudflare API application template and paste both values in.
This page covers Cloudflare API, where Fluency calls Cloudflare on a schedule. Cloudflare's other route is Logpush, where Cloudflare sends to you: that is the Cloudflare Log Push integration type on Platform → Integrations, and it takes no configuration at all, because there the vendor is pointed at the platform rather than the other way round.
They are not alternatives to be chosen between so much as two different feeds — see What arrives.
What arrives
| Source | What it holds | Notes |
|---|---|---|
| Audit log | Dashboard and API activity: who changed what, when, from where | Per-action records. Account-scoped. |
| GraphQL Analytics API | Traffic, firewall and security analytics | Aggregated, not per-request — see below. |
Cloudflare's GraphQL Analytics API answers with counts grouped into time buckets and dimensions — requests by status code, firewall events by action and rule, threats by country. It does not return one record per HTTP request, and no permission on the token changes that.
Per-request records are a different product: Logpush, which Cloudflare gates behind its Enterprise plan and which delivers to a destination you nominate rather than answering a query. If what you need is the individual request — the URI, the client IP, the ray ID — this template is not the feed that carries it, and no amount of tuning here will make it so. Use Cloudflare Log Push for that, alongside this one if you want both.
The practical consequence for monitoring: do not use record volume as this integration's health check. Analytics roll-ups arrive at a cadence that has little to do with how much traffic your sites are taking. Confirm it is running gives a check that does not depend on volume.
Before you begin
An account-level administrator, or someone who can create API tokens for the account. A token can only grant permissions its creator holds.
A decision about who owns the token. Cloudflare issues both user tokens, which belong to the person who created them and die with their access, and account-owned tokens, which belong to the account itself. For an integration that has to keep working after the person who set it up changes roles, an account-owned token is the right choice — and it changes which verification endpoint you use later, so decide now.
Part 1 — Cloudflare
1. Read the Account ID
The Account ID is a 32-character hexadecimal identifier. The quickest place to read it is the dashboard URL itself, which is of the form dash.cloudflare.com/<account id>/…. It is also shown in the API panel on the right of any zone's Overview page.
Both are 32-character hexadecimal strings, both are labelled on an Overview page, and the API panel shows them one above the other. The template wants the Account ID — the one that identifies your Cloudflare account, not the one that identifies a single domain.
A Zone ID entered here is well-formed, so nothing rejects it. The install succeeds and collection returns nothing useful.
2. Create the API token
For a user token: open My Profile → API Tokens → Create Token.
For an account-owned token: open Manage Account → API Tokens → Create Token.
Either way, choose Create Custom Token rather than one of the templates — none of the presets matches what this integration needs.
3. Grant the permissions
Add these permission rows, all at Account scope:
| Permission | Access | What it buys |
|---|---|---|
| Audit Logs | Read | The dashboard and API activity log. |
| Account Analytics | Read | Account-scoped datasets in the GraphQL Analytics API. |
Under Account Resources, include the account whose ID you read in step 1.
Two things worth being deliberate about:
- Zone-scoped analytics need a zone permission as well. Some GraphQL datasets are zone-scoped rather than account-scoped. If you want those, add Zone → Analytics → Read and set Zone Resources to All zones from an account — otherwise a zone added next year is silently outside the token's reach.
- Do not grant edit anywhere. This integration only ever reads. An Edit on any Cloudflare permission group is a token that can change DNS, and it is being stored in a third-party system.
Leave Client IP Address Filtering empty unless you know the egress addresses Fluency will call from and intend to maintain that list.
TTL is optional and defaults to no expiry. If you set one, see Maintenance — an expiring token stops working on a date nobody is watching for.
4. Copy the token
Cloudflare displays the token value on the confirmation screen after creation and never again. Copy it now. If you lose it, the only recovery is to Roll the token, which issues a new value and invalidates the old one.
| Value | Where it came from |
|---|---|
| Account ID | The dashboard URL, or a zone's Overview page — step 1. |
| API Token | The confirmation screen in step 4. |
Verify before you leave Cloudflare
Cloudflare will tell you whether the token is live, which separates a credential problem from an empty feed later. Which endpoint you call depends on the choice you made in Before you begin:
A user token:
curl -s "https://api.cloudflare.com/client/v4/user/tokens/verify" \
  -H "Authorization: Bearer $CF_API_TOKEN"
An account-owned token:
curl -s "https://api.cloudflare.com/client/v4/accounts/$CF_ACCOUNT_ID/tokens/verify" \
  -H "Authorization: Bearer $CF_API_TOKEN"
A healthy answer carries "success": true and a result whose status is active.
Then prove the token can actually see the account you named, which the verify call does not establish:
curl -s "https://api.cloudflare.com/client/v4/graphql" \
  -H "Authorization: Bearer $CF_API_TOKEN" \
  -H "Content-Type: application/json" \
  --data '{"query":"query { viewer { accounts(filter:{accountTag:\"'"$CF_ACCOUNT_ID"'\"}) { accountTag } } }"}'
The account tag comes back if the token has account access; an empty accounts array means the token is valid but scoped somewhere else.
| Response | What it means |
|---|---|
"success": true, status active | The token works. |
"success": false with an authentication error | The token value is wrong, was rolled, or was revoked. Back to step 4. |
404 on the account-owned verify path | It is a user token — use the /user/tokens/verify form instead. |
Verify succeeds, accounts array empty | The account resource was not included in the token. Back to step 3. |
| Verify succeeds, GraphQL returns a permission error | Account Analytics → Read is missing. Back to step 3. |
Note that a token can be valid and still be missing one of the two permissions, and the two halves fail independently: audit logs can collect while analytics returns nothing, or the reverse. Check both rows in step 3 rather than concluding from one working call that the token is complete.
Part 2 — Fluency
Install the Application
Go to Platform → Applications → Install Application From Template and choose Cloudflare API from the Cloud-based Business Softwares category. Both parameters are required and both open empty.
| Parameter | Notes |
|---|---|
| Account ID | The 32-character account identifier from step 1 — not the Zone ID. |
| API Token | The token value from step 4. |
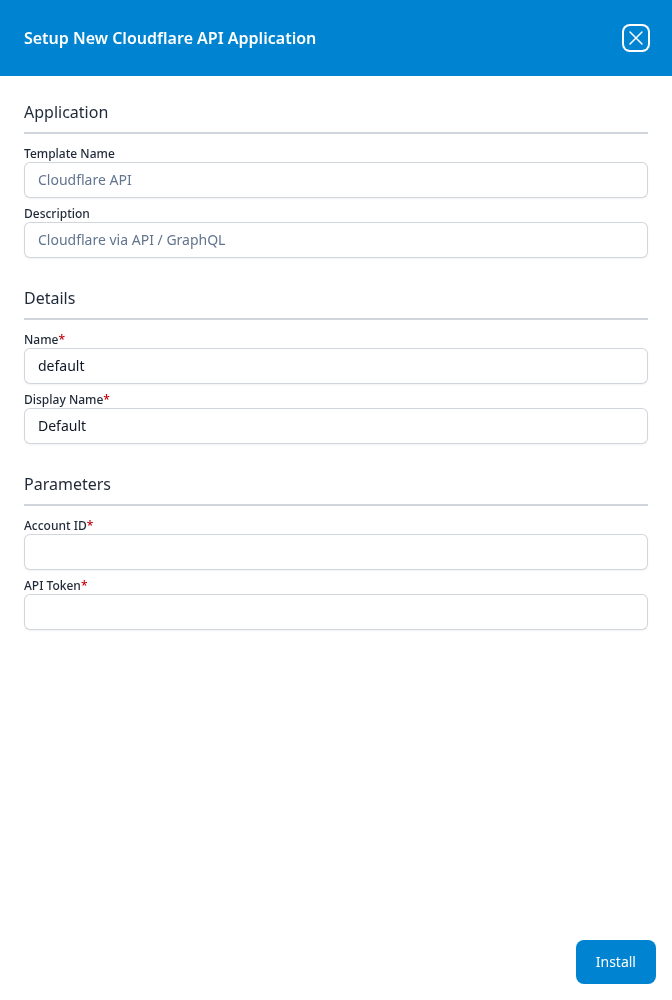
Leave Name and Display Name at default / Default unless you are installing a second instance — collecting from two Cloudflare accounts, for example — in which case give each one a name you will recognise on the applications list.
Unlike most templates, CloudflareAPI takes no datalake or datalake index name parameter — the destination is fixed by the template rather than chosen on the form, so there is nothing here to collide with another application. To see where the data actually lands, open the installed application's details panel with the blue eye button and read its Actions list, which records every object the install created.
Press Install. The application then appears in the Installed Applications view, where its badge reads Running once the pipeline is up.
Confirm it is running
A Running badge means the pipeline started; it does not mean Cloudflare accepted the token. And because the analytics half is aggregated, watching throughput will not tell you either — a quiet roll-up looks the same as a broken credential.
Check it the way that gives an unambiguous answer:
- Generate an audit event you can recognise. Change something harmless in the Cloudflare dashboard — edit a DNS record's comment, rename a page rule — and look for it in the lake. The audit log is the half that responds to an action you control, which makes it the better test of the two.
- Re-run the verify call from Verify before you leave Cloudflare if nothing appears. It distinguishes wrong credential from nothing has happened yet, which no view from the Fluency side can.
- Read the Actions list. The installed application's details panel records every object the install created, including where it writes. That is the authoritative answer to which index to search.
See Confirm data is arriving for the general procedure.
Maintenance
Rotating the token
Template parameters are read-only after install, so a new token means uninstalling and installing again. Cloudflare's Roll action replaces a token's value in place and invalidates the old one immediately, with no overlap — so do it in this order:
- In Cloudflare, open the token and use Roll. Copy the new value.
- In Fluency, uninstall the Cloudflare API application.
- Install it again with the same Account ID and the new token.
Between steps 1 and 3 the integration is collecting nothing. Keep the window short rather than starting this at the end of a day.
Expiry, where you set one
A token with a TTL stops working on its end date, and the first symptom is an integration that has been silently collecting nothing. Cloudflare does not renew it for you. If you set a TTL, record the date at install time — the alternative is discovering it at the point where you have already lost the data.
Review, where you did not
A token with no TTL never expires, but it can be revoked or rolled by anyone with account access, and Cloudflare will not tell Fluency that it happened. An integration that worked for months and then stopped with no change on our side is usually this. The token list in the dashboard shows each token's Last used time, which is the quickest way to see whether Fluency is still calling.
Removing the integration
Uninstall the application in Fluency first, then delete the token in Cloudflare. In that order the credential is dead before it is orphaned; in the other order the application spends the interval failing to authenticate.
Troubleshooting
| Symptom | Likely cause | Fix |
|---|---|---|
| Running, nothing in the lake | Token is wrong, rolled or revoked | Re-run the verify call (Verify) |
| Audit entries arrive, analytics does not | Account Analytics → Read missing from the token | Edit the token's permissions; the Token ID and value are unchanged by an edit |
| Analytics arrives, audit entries do not | Audit Logs → Read missing from the token | As above |
Nothing arrives, verify says active | The account resource was not included, or the Account ID entered was a Zone ID | Check both — step 1 and step 3 |
| It worked, then stopped, nothing changed here | Token rolled, revoked, or its TTL expired | Check Last used on the token list |
| Per-request HTTP logs never appear | They are not in this feed | Use Logpush — see What arrives |
Editing an existing token's permissions leaves its Token ID and value untouched, so adding a missing permission does not require a reinstall on the Fluency side. Allow a little time for the change to take effect before re-testing.
Under the hood
Engineering reference
Template. Template ID CloudflareAPI, display name Cloudflare API, description Cloudflare via API / GraphQL, filed under Cloud-based Business Softwares. Two parameters, Account ID and API Token, both required, no datalake or index parameter and therefore no Advanced Configurations row on the form.
Rate limit. Cloudflare's global API rate limit is 1,200 requests per five minutes per user, shared across everything calling with that identity. The GraphQL Analytics API applies its own limits on query complexity and time range on top of that. A second application installed against the same account competes for the same budget.
Endpoint hosts. api.cloudflare.com/client/v4 for the REST API and api.cloudflare.com/client/v4/graphql for GraphQL, per Cloudflare's own API documentation. The curl calls in Verify before you leave Cloudflare exercise both.
Where it writes. Read the installed application's Actions list — it records every object the install created, including the destination index. That is the current answer for your deployment, where anything printed here would be a guess about a template that can change.
References
Vendor
- Cloudflare API tokens — creating, scoping and rolling tokens
- GraphQL Analytics API — datasets, scopes and limits
- Cloudflare audit logs — what the audit log records
- Logpush — the per-request feed this template does not carry
Fluency
- Install Application From Template
- New Integration — Cloudflare Log Push
- Confirm data is arriving
- Cloud Networking — other SASE, DNS and proxy sources