Creating a Behavior Rule
The screenshots in this walkthrough are from the older "Event Watch Configuration" dialog. In the current interface the equivalent is the Add Behavior Rule wizard opened by Create Rule on the SIEM → Behavior Rules page; its steps are Bucket Definition, Selection Criteria, and Activity Performed. A standalone Import Sigma Rule button is not part of the current documented page. The rule-building concepts below still apply, but each step's controls need to be re-verified against the current wizard.
Page Layout
Sign in to your Fluency portal at https://<companyname>.app.ingext.io — see Fluency Web Interface for the URL formats.
Choose the Behavior Rules option under the SIEM menu in the navigation bar.
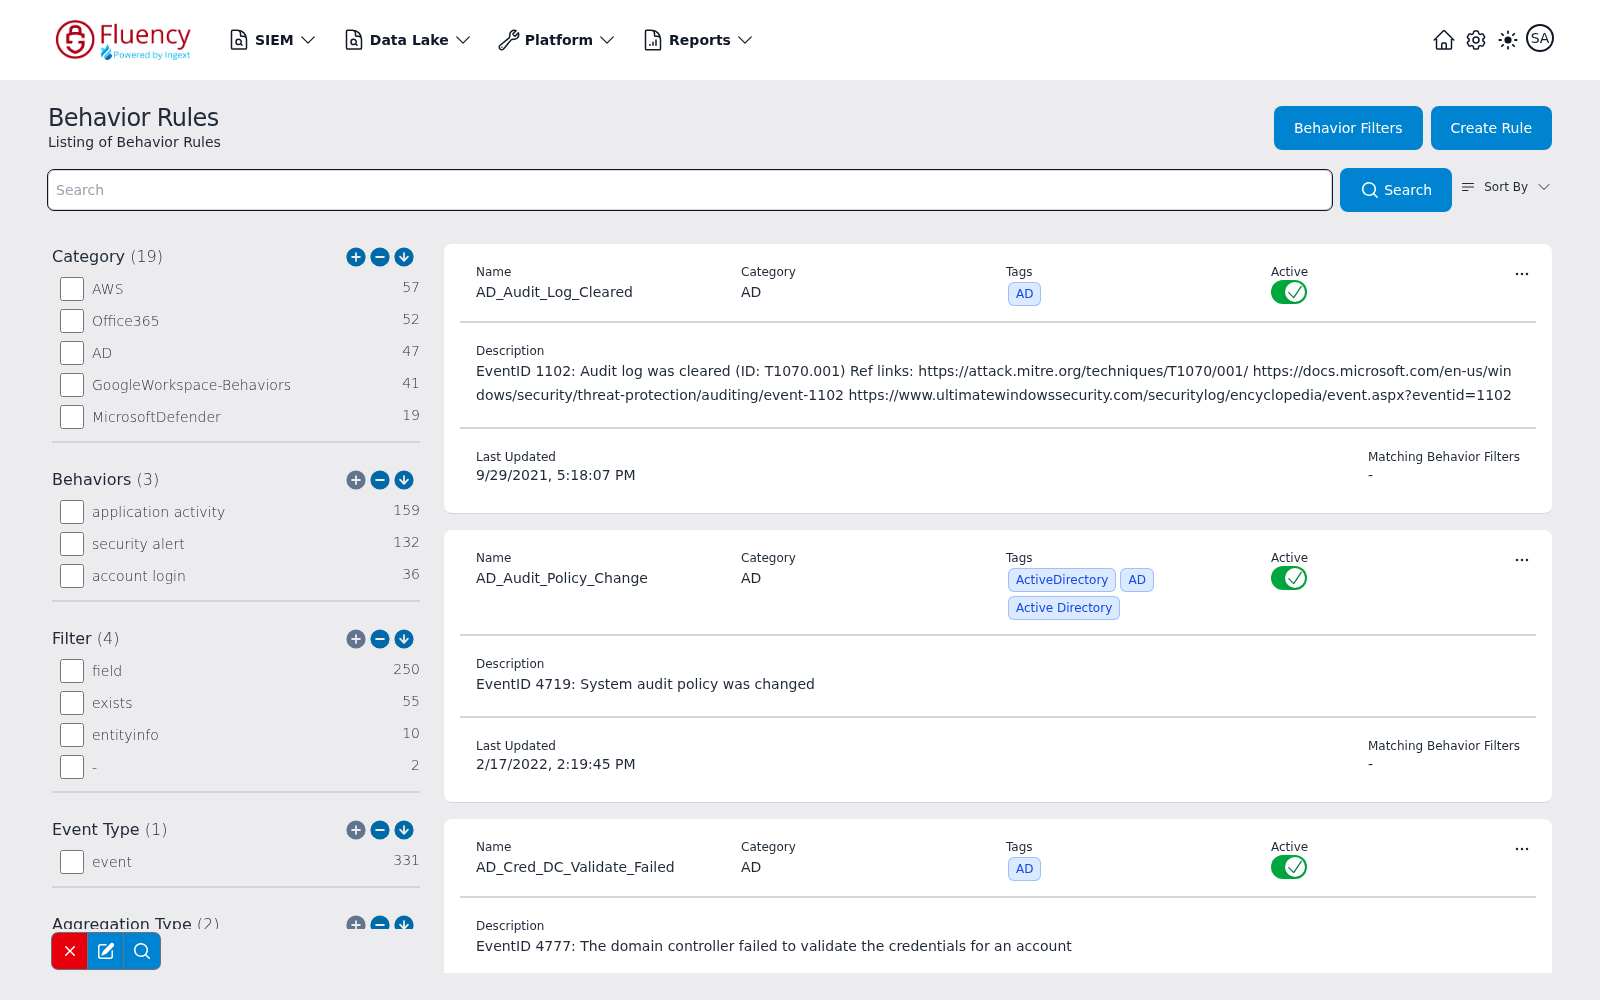
This page lists every behavior rule (event bucket) currently configured, one card per rule. Rules can be searched and filtered using the facet sidebar to the left of the list.
Each rule card has an Active toggle: a green check means the rule is on, and clicking it switches the rule off (shown as a red X). Each card also has a three-dot (...) actions menu with four options: View (open the rule for viewing and editing), Clone (make a copy to change and save as a new rule), View JSON, and Download JSON.
Import and Create Rule
In the top right corner of the page there are two buttons: Behavior Filters (which opens the Behavior Filters page of rule exceptions) and Create Rule.
Create Rule: add a behavior model
Clicking Create Rule opens the Add Behavior Rule dialog, a three-step wizard: Bucket Definition, Selection Criteria, and Activity Performed.
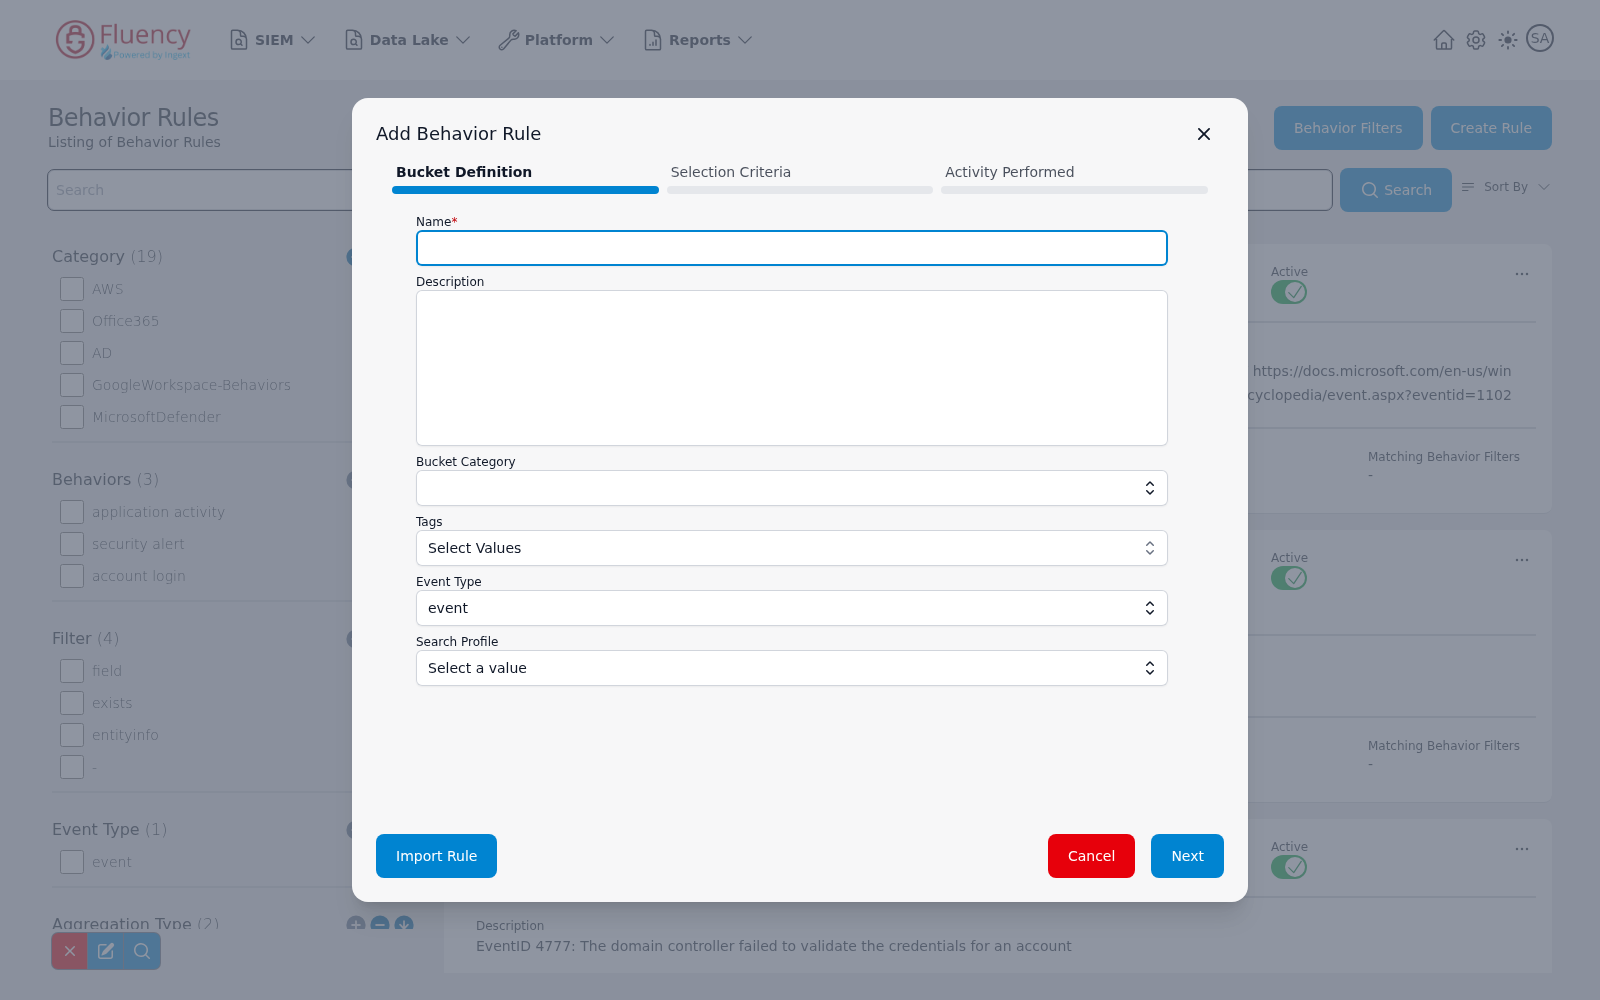
The first step, Bucket Definition, contains a required Name text field, a multi-line Description, a Bucket Category drop-down, a Tags multi-select (Select Values), an Event Type drop-down preset to event, and a Search Profile drop-down (Select a value). At the bottom of the dialog, Import Rule loads an existing rule definition instead of building one from scratch, Cancel closes the dialog, and Next advances to the following step; the X in the upper-right corner also closes the dialog.
Import Rule
To import an existing rule definition instead of building one from scratch, use the Import Rule button at the bottom of the Add Behavior Rule dialog.
As an example, you are going to create a model to collect events where the "FilePreviewed" or "FileDownloaded" operations were performed. This alert will trigger when a user previews or downloads more than 20 files in an hour. The steps are decribed below.
(1) Bucket Definition
Give the event a name; in this case you will call it "O365_Files_Accessed". Optionally, give it a description as well. Next, assign the bucket a category. In this case, the category is "Office365". This allows buckets to be grouped more easily for usage and search purposes. Multiple tags can be attached to the bucket; these can also be used for searching.
Select an Event type from the dropdown menu. Event buckets can be applied to both metaflow data and event data. In this case, you want to apply this bucket to event data.
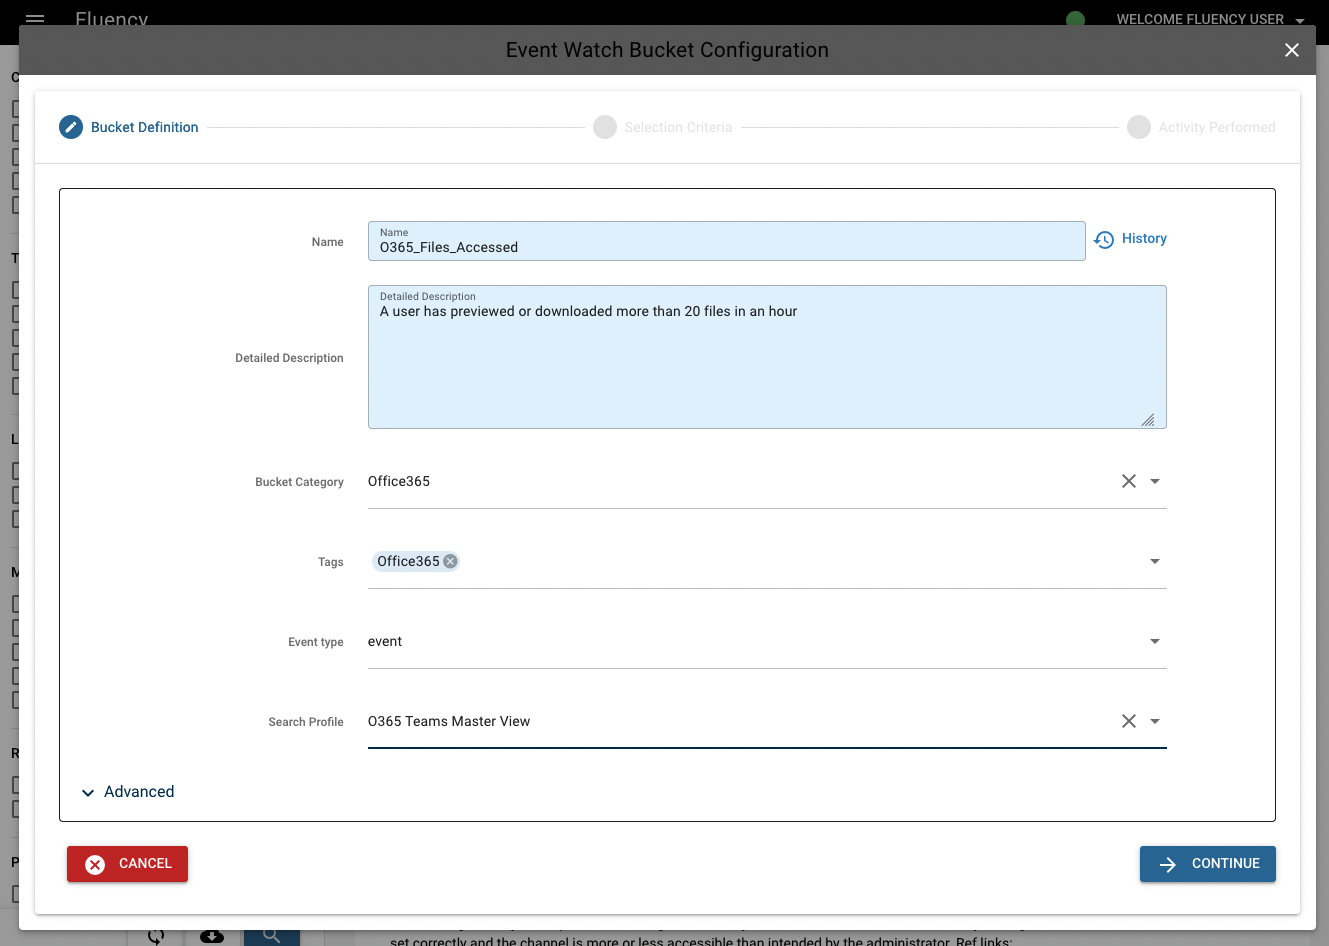
NOTE: Bucket naming convention typically consists of underscores between each word.
(2) Selection Criteria
Once the "Match All" box is unchecked, click the "+ FILTER" button that appears to open this window. There are five filter types: "Field", "Entityinfo", "Regexp", "Exists", and "Feed". "Field" matches values to a key field selected. "Entityinfo" uses a defined entity list to match multiple values, and potentially translates them as well. "Regexp" allows you to use a regular expression. "Exists" determines if the field exists or not.
In this case, you want "field". Select/search the desired field from the dropdown, or type it into the box, then add values to the "Match" box.
Once you've typed in a match, press enter to add it to the list. Once added, the match will look like this. Press the "SAVE" button to attach this filter to the event bucket.
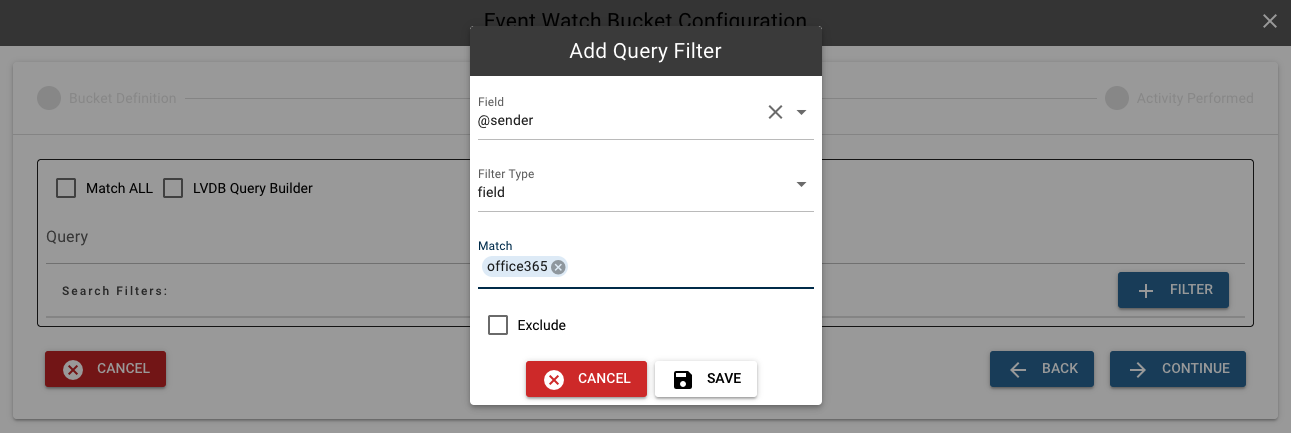
More matches can continue to be added in this manner. For this model, you also want a filter that selects only O365 events with the "FilePreviewed" or "FileDownloaded" operation.
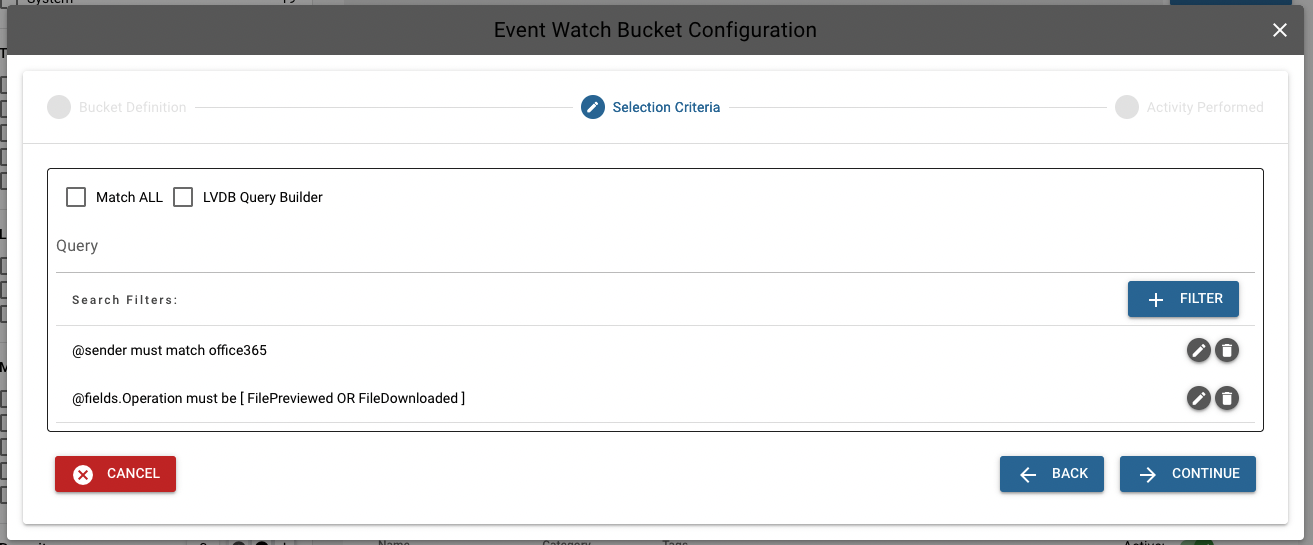
Selection can also be written as a query. For example, say you want to find bidirectional communication on the Windows remote desktop port (3389). You can create a search to look for this activity:
dp:3389 AND NOT rxB:0 AND NOT txB:0
The same selection can be done in the Event table by fully listing the field name. The disadvantage is that event data is not normally parsed to normalize protocol fields. The following is the above example, but this time writing the selection against the Event table:
@peplink.dpt:3389 AND NOT @peplink.bytes_recvd:0 AND NOT @peplink.bytes_sent:0
More complex selection logic is best done with a query tree.
(3) Activity Performed
Scroll down to the "Activity Performed" section and choose the "Behavior" tab to begin this process.
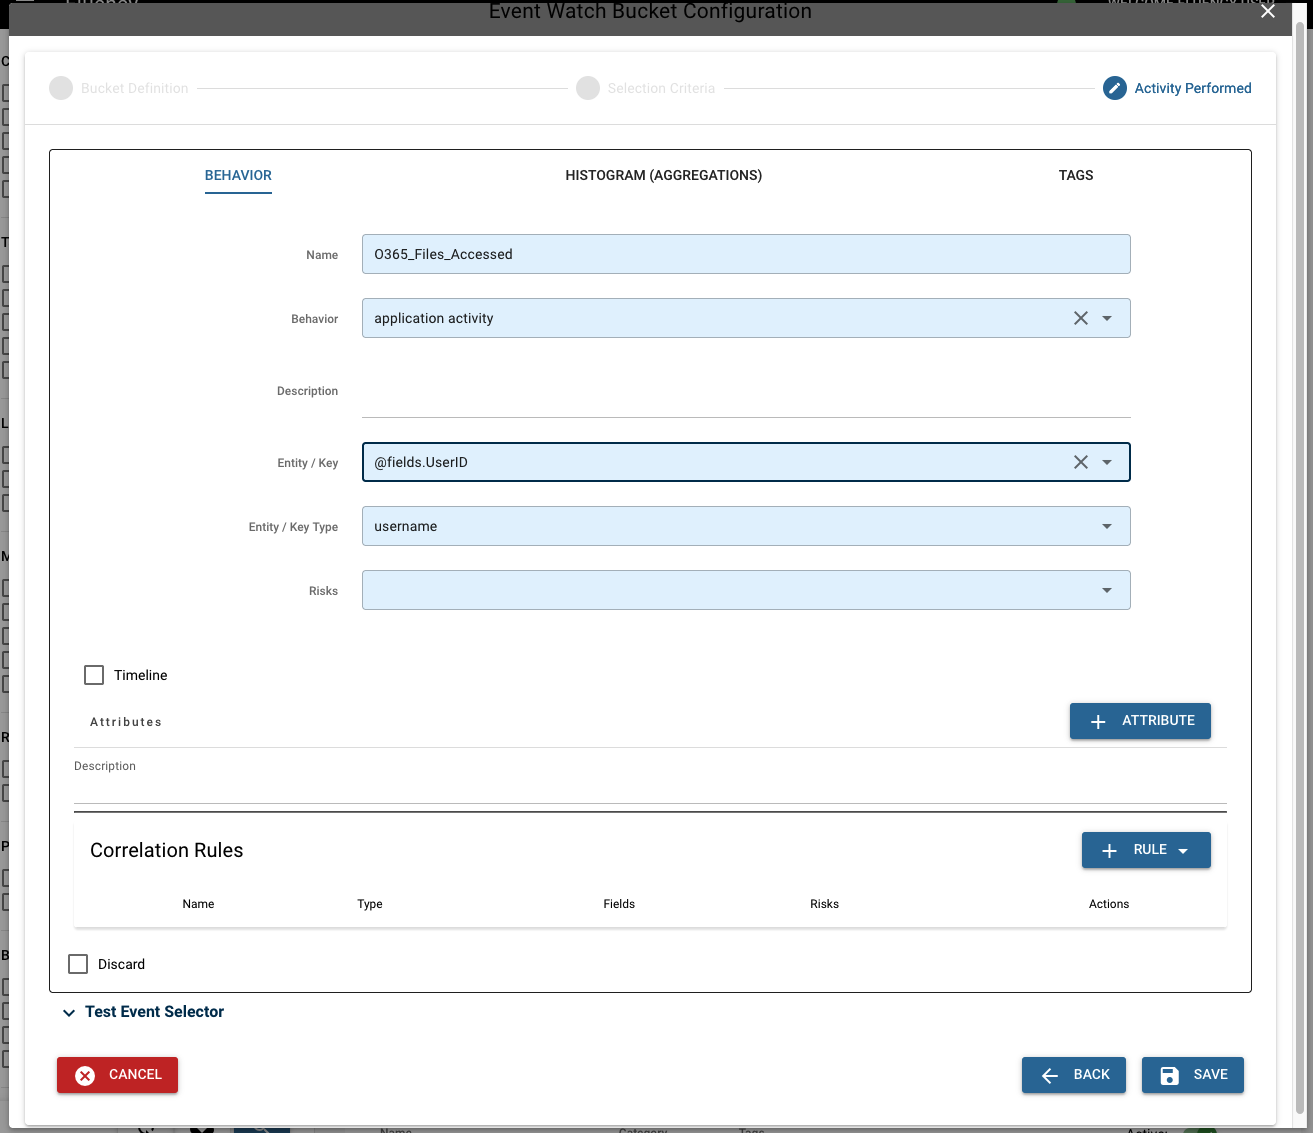
Begin by giving the behavior model a name. Next, select the type of behavior from the following: "network access", "account login", "application activity", and "security alert". Then, select a key and key type. This key will display at the top of a behavior alert, and is the field used for sorting alerts.
NOTE: The name of the behavior should match the name of the bucket.
Next, add attributes to the bucket. These attributes will appear attached to each alert. As you type in the fields box, search options will appear in the drop-down menu populated with already existing fields from event data. Values not appearing in this search can also be entered. In this case, you want "@fields.UserId", so you can select it from the drop-down menu. Next, give the attribute an alias. This alias allows the attribute to display on an alert with a more clear name.
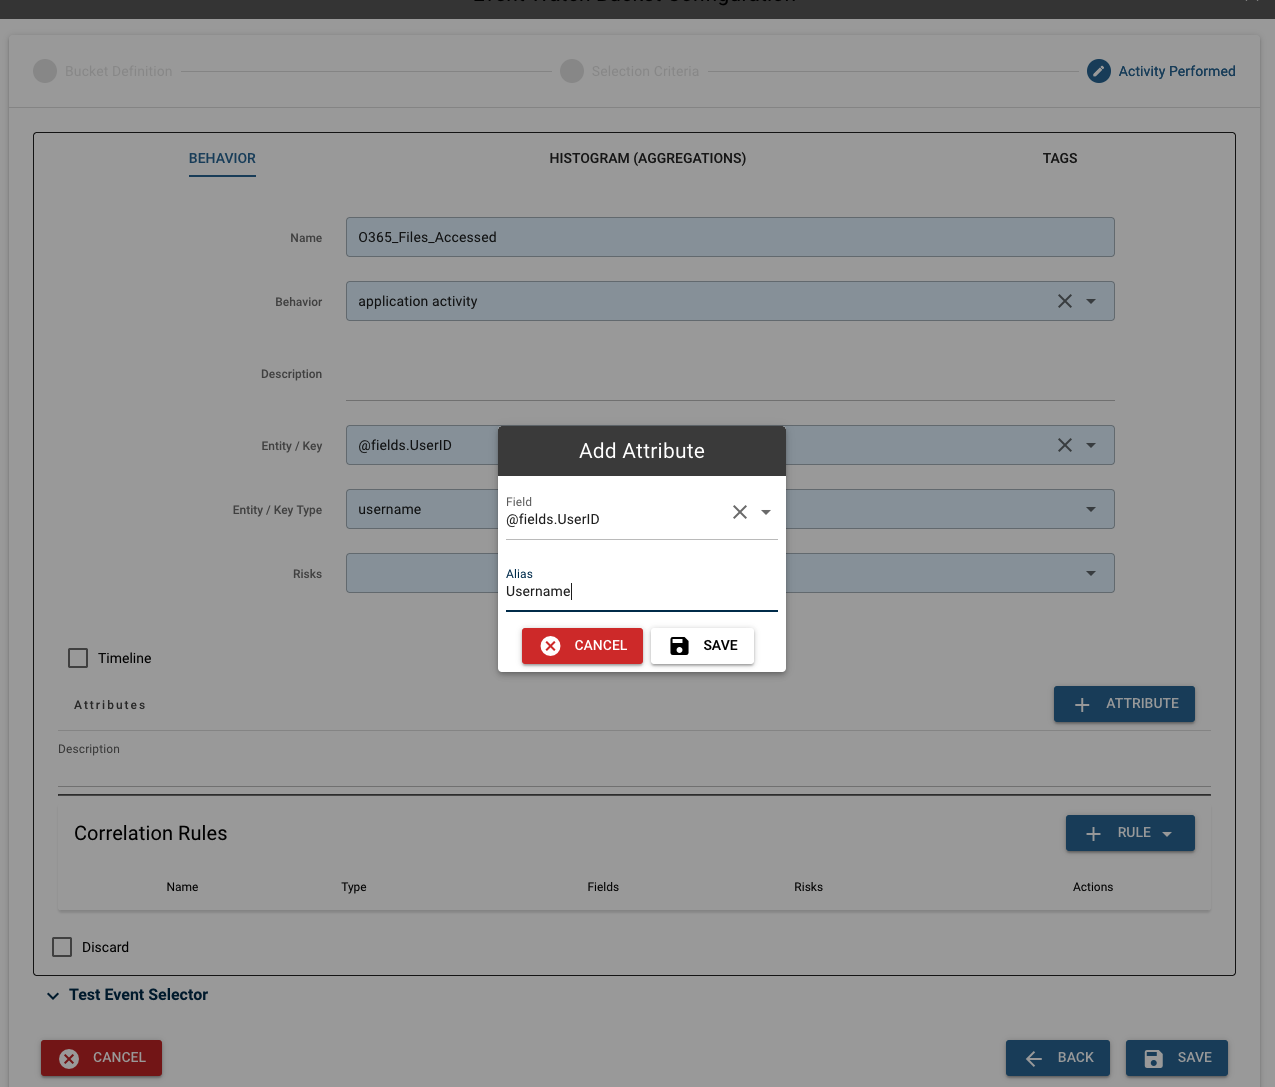
NOTE: The alias cannot contain spaces, and should be written in camelcase with the first letter capitalized (Ex. FieldName).
Once "SAVE" is clicked, the attribute will appear in the list, with options to edit or discard each attribute. More attributes can be added in this manner, with a maximum of 16 total.
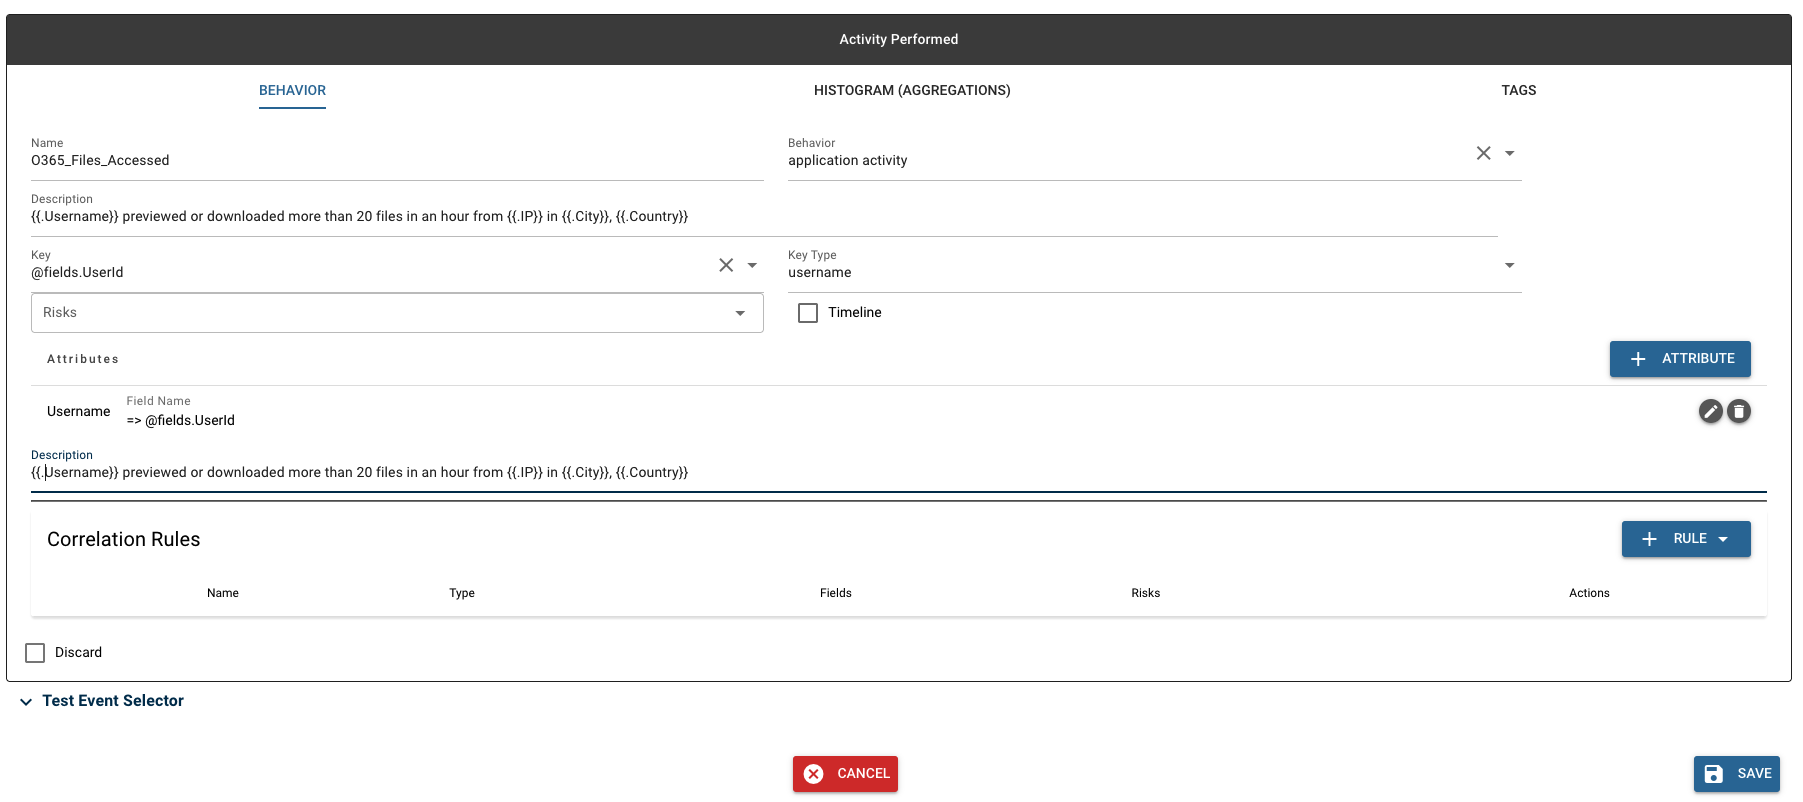
Once all the desired attributes have been added, a description can be written. This should describe what has occurred when an alert is triggered. In this case, you want to write something that a large number of files was previewed or downloaded, and include details on the user that performed this action, in addition to location details.
NOTE: Attributes can be referenced in the description. This allows attributes to be filled in with the proper values attached to an alert. This can be done by enclosing it in double brackets with a period preceding the alias.
The description is "{{.Username}} previewed or downloaded more than 20 files in an hour from {{.IP}} in {{.City}}, {{.Country}}.” The username, IP, city, and country fields will be populated with the appropriate values when an alert triggers.
(4) Correlation Rules
The last step is to add correlation rules. There are two options for types of correlation rules: "First Occurrence" and "Metric Aggregation".
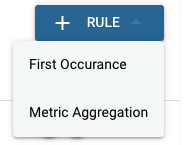
The first occurrence rule will trigger whenever a value associated with a chosen field appears for the first time. The metric aggregation rule has different types, such as "sum" or "cardinality", and will trigger when the aggregation of this type exceeds a specified value.
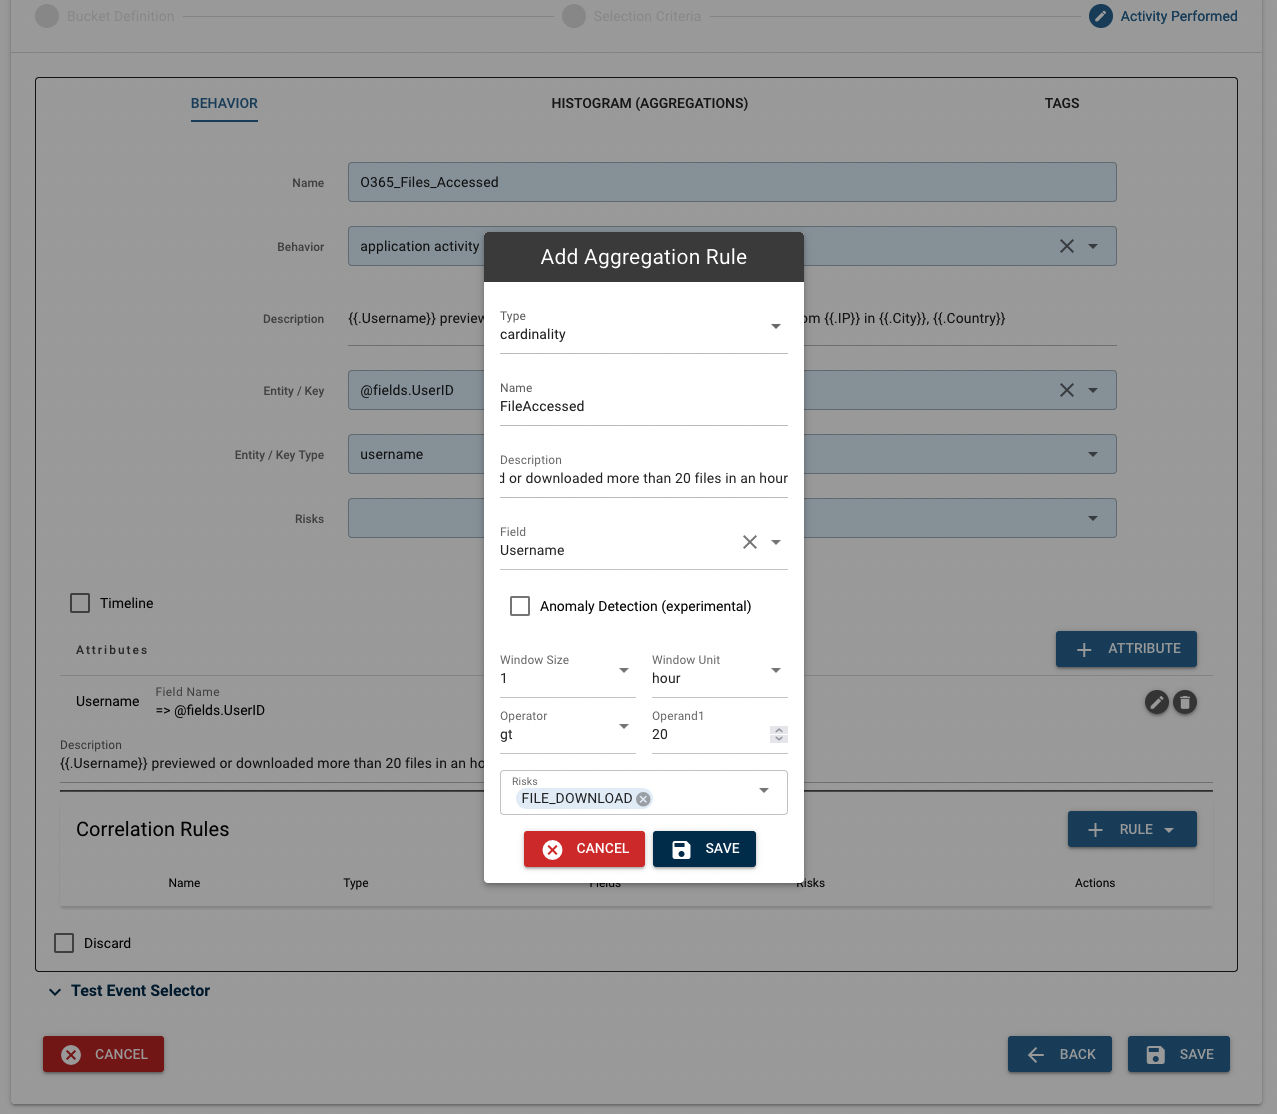
For this bucket, you want a metric aggregation rule to trigger when there are 20 unique files accessed within an hour. In the pop-up window, since you are looking at unique files, you want to use the "cardinality" type. The name of this rule is "FilesAccessed" and the description is "A user previewed or downloaded more than 20 files in an hour." The selected field is "FileName".
Next, define the window and operand, and add risks. The window, in this case, is 1 hour, and the operand is gt (greater than) 20, since you are looking for a trigger on more than 20 unique files in an hour. The risks' drop-down menu contains a list of pre-written risks. Choose the risk(s) that apply the closest to the correlation rule. Click "SAVE" to add the rule to the table.
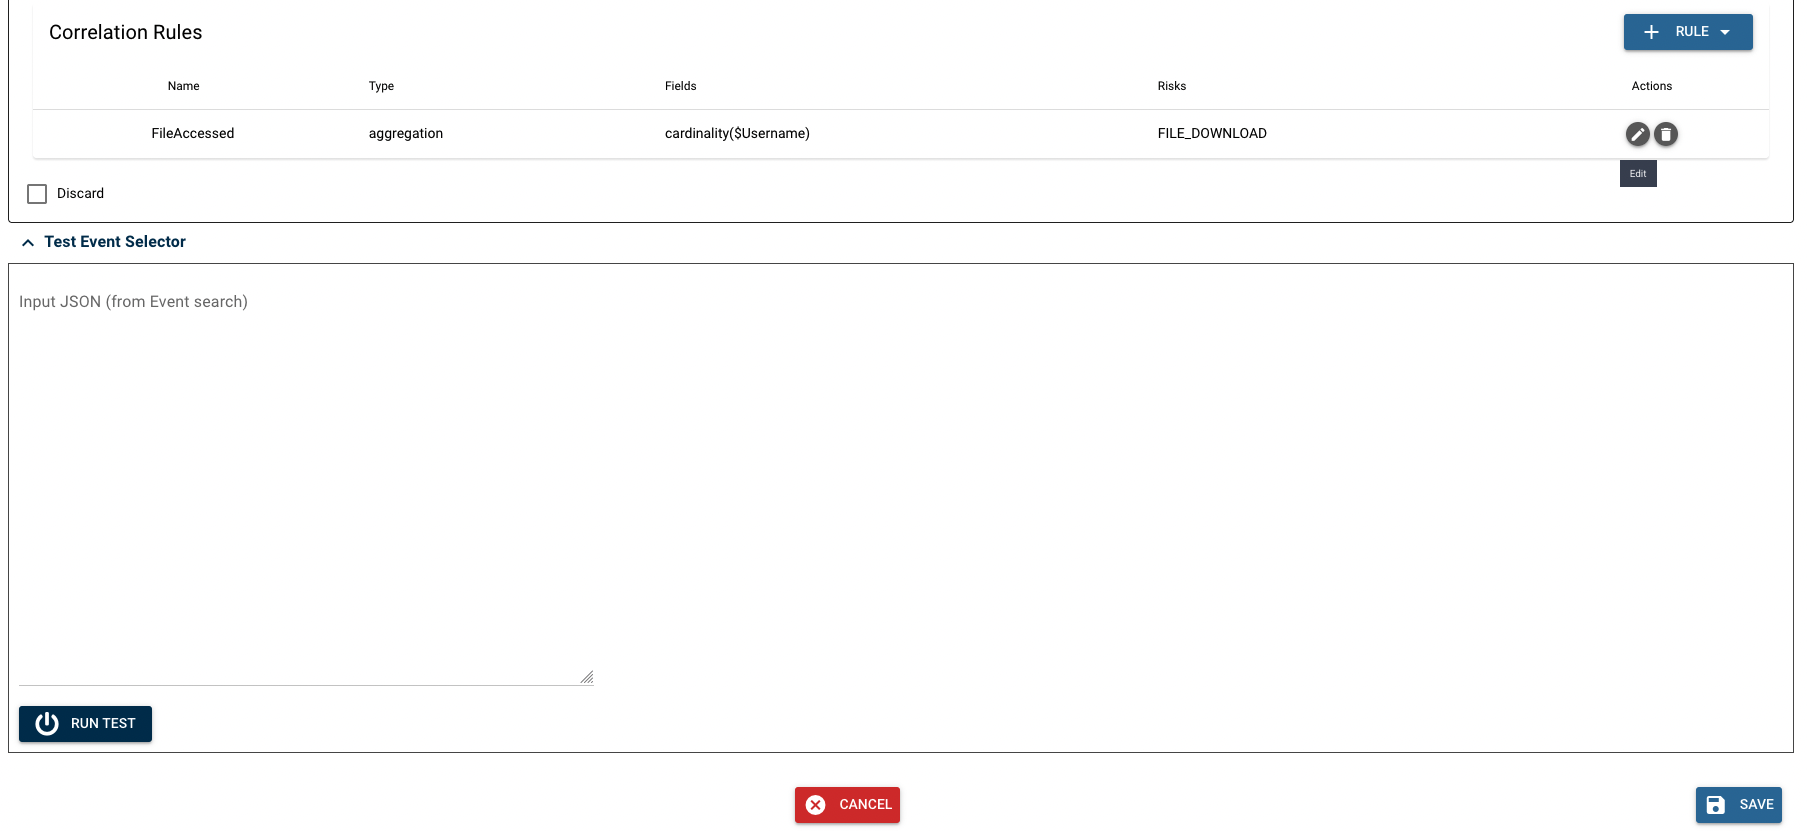
Once the model is saved, it should appear like below. Multiple correlation rules can be added to each behavior.
(5) Test
Models can be tested using the test tab at the bottom of the window. This opens up a text box that allows an input to be entered. Both an event that is expected to trigger the behavior and an event that is NOT expected to trigger the behavior should be tested in order to ensure the model is working as expected.
If the test runs and a green check mark is displayed, this means the event will trigger the behavior.
If the test runs and a red "x" is displayed, this means the event will NOT trigger the behavior. Sample events for pre-written models are available in the Fluency rules manual.
Once the model is written as desired, click "SAVE." This will save the bucket, and allow it to begin aggregating data.
Editing an Existing Model
On the rules page, open a rule card's three-dot (...) actions menu and choose View. This opens the Update Behavior Rule dialog — the same three-step wizard, pre-filled with the selected rule — where the rule can be edited.
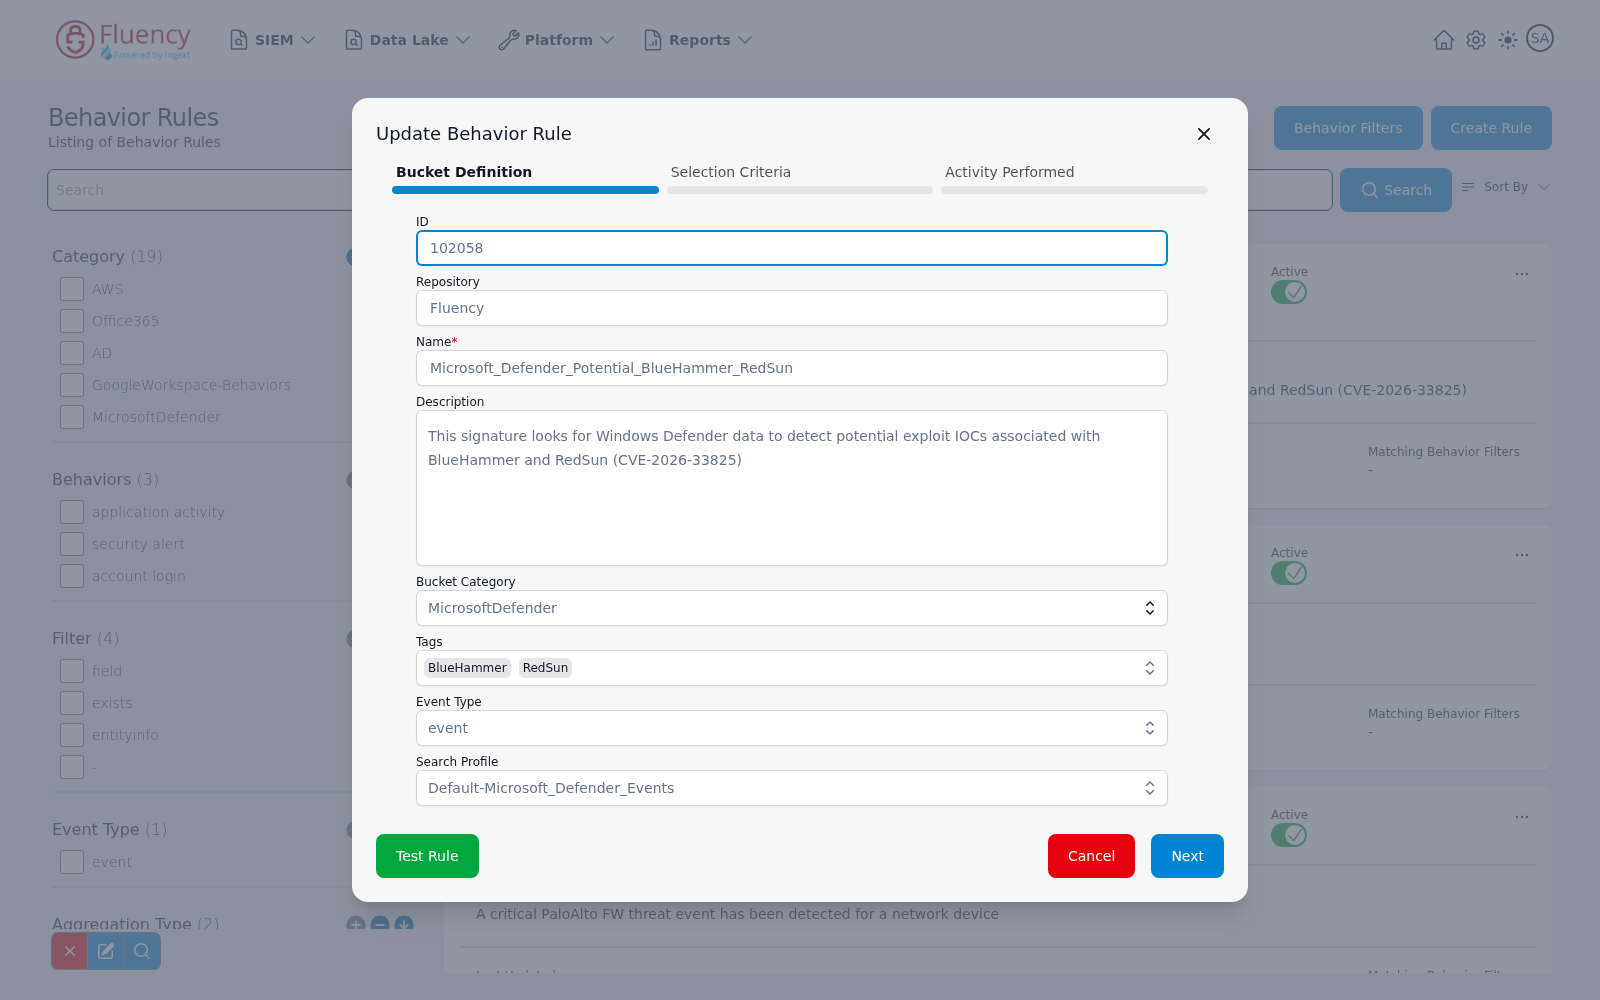
An existing rule will have an assigned Identifier (ID), which is a unique number. It will also show the Repository of the rule. Both appear at the top of the Bucket Definition step, ahead of the pre-filled Name, Description, Bucket Category, Tags, Event Type, and Search Profile fields. The footer differs from the create wizard's: a green Test Rule button sits on the left, with Cancel and Next on the right.
See Managing Rules for best practices on duplicating a rule before editing it.